Video
Homemade Sandwich Bread
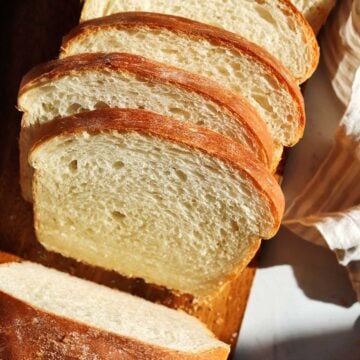
Learn how to make delicious fresh bread at home without preservatives using this Homemade Sandwich Bread recipe. This classic homestyle loaf recipe is so soft and fluffy while still being sturdy and passes the spread test. It's perfect for breakfast, lunch, tea sandwiches and dipping into soups. Enjoy it for morning toast or a late night grilled cheese snack and pack it up for school lunches.
Ingredients
- 6 cups (850g) unbleached bread flour
- 1 tablespoon (17g) fine salt
- 3 tablespoon + 2 tsp (50g) liquid oil such as vegetable, canola, sunflower or olive oil
- 2 ¼ teaspoon (7g) instant dry yeast
- ¼ cup (50g) granulated sugar*
- 2 ¼ cups (540g) water, plus more if needed (add in 20ml increments)
*See notes in FAQ section about reducing the sugar quantity if desired.
Instructions
- Make the dough. Combine dry ingredients. Place flour in the bowl of a stand mixer. Add in yeast, sugar and salt in little piles in separate places over the flour in the bowl so that they are not touching. You do not want the salt in direct contact with the yeast for a prolonged period of time without mixing or it can inhibit its activity.
- Add wet ingredients. Add in the oil and water. (Note: if using a stand mixer at standard room temperature, use cool water around 16 degrees C (60 degrees F)).
- Mix the dough. Attach the dough hook and mix on medium-low for 10-15 minutes until it the surface looks smooth. Stop after a 2 minutes to scrape down the sides of the bowl and ensure all of the flour is incorporated and the dough is a uniform mixture. It will still be wet and rather loose at this point. Continue mixing for another 2-3 minutes. The dough should start to climb up the dough hook and will still be webbing around the bottom of the bowl. (Note: if the dough seems rather dry and stiff at this point, add water at 20ml increments until you reach a softer consistency as described). Stop the mixer and scrape around the inside of the bowl to release the dough. Continue mixing for another 3 minutes. Stop again, pull the dough off of the hook and scrape around the inside of the bowl to release the dough again. Continue mixing for another 3-5 minutes. At this point the dough should start forming a mass and come away from the bowl as it is mixing. You can check the temperature of the dough now if you have a digital thermometer – it should be between 24-26 degrees C (75-80 degrees F) for optimal activity.
- Knead the dough. Transfer the dough to a lightly floured work surface. Now you will stretch and fold the dough to help develop the gluten structure. Using both hands, grab both sides of the dough, pull it outwards (this is the “stretch”), then fold it inwards over itself. Rotate the dough and continue to stretch and fold until the dough feels very smooth. Watch my video for a full tutorial. Shape the dough into a ball by tucking the sides underneath and rolling it around the counter. The surface of the dough ball should pull smoothly without tearing.
- Bulk Fermentation (first rise). Place the ball into a lightly oiled bowl. Cover the bowl with plastic and then cover with a kitchen towel. Set it aside in a warm dark place and let it rise for 1-2 hours until nearly doubled in size. Note that the amount of time required will depend on the temperature of your kitchen.
- Divide the dough into two equal portions and pre-shape. Very lightly dust a work surface with flour and tip to dough out onto the surface. Divide the dough into 2 equal portions (approximately 750g each) and shape into balls. If you want to make three-piece loaves, you can divide into 6 equal portions (approximately 250g each) and shape into balls.
- Rest the dough. Cover the dough balls and rest them for 20 minutes. This will allow the gluten to relax from the tension built up during rounding.
- Prepare the pans and perform the final shaping. Spray or coat two 9x5 inch loaf pans lightly with oil. Use minimal to no flour when shaping as you need the dough pieces to adhere somewhat to the working surface. If shaping into logs, flatten and degas the dough balls with your knuckles. Pull the dough into a rough rectangular shape about 8-inches wide. Roll up the dough by starting at one end and moving across the width of the dough piece for a tight curl. Continue rolling up the dough until it is a log shape and seal the seam with heel of your palm. (Watch video for molding technique). It is important to build tension on the surface of the dough so it rises upward for better volume, as well as a nice dome shape vs. a flat top. Place the logs into the pan. If making three piece loaves, place three smaller dough balls into each pan and press them down with with your knuckles to fill out the corners of the pan.
- Proof the loaves (second rise). Cover the loaf pans to prevent the dough from drying out and place them somewhere warm to rise until fully proofed, or when the surface just slightly retains a finger imprint when pressed. I recommend to proof them uncovered in the oven on proof setting. I like to place a tray of off the boil water on a rack below the pans to keep the oven humid to prevent skinning of the dough. The optimal proofing conditions for this type of bread is around 30 degrees C (86 degrees F) at 85% humidity. If you proof at a lower temperature, it will take longer, but you will be rewarded with better flavor.
- Bake. Once fully proofed, bake them at 175 degrees C (350 degrees F) for around 35 minutes. Since they are quite large loaves you may need to lower your oven racks or they might brown too quickly on the top. You can check the internal temperature with a digital thermometer, which should read at least 94 degrees C (200 degrees F). Remove the loaves from the pan and place on a wire rack to cool to below 35 degrees C (95 degrees F) before slicing and/or packaging.
