Video
Peanut Butter Easter Eggs
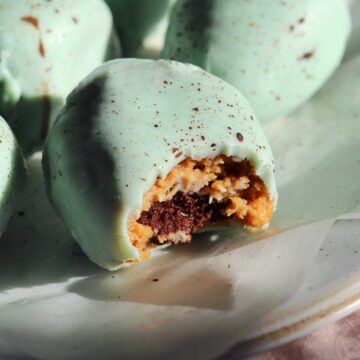
This is a better-for-you version of Reese's Peanut Butter Easter Eggs and they taste way better with rich peanut butter flavor that's not too sweet. They're simple to make and a great activity for the kiddos!
Ingredients
Chocolate Yolk Filling:
- 2 ½ oz (70g) high quality semisweet chocolate (minimum 55% cocoa and up to 65%)
- 2 tbsp (30ml) hot water
Peanut Butter Egg Filling:
- ½ cup (130g) natural drippy smooth peanut butter (no sugar added)
- 2 tablespoon (30ml) maple syrup
- ½ cup (50g) fine almond flour
- 1 tablespoon powdered sugar (optional)
- ⅛ teaspoon salt
White Chocolate Coating:
- 6 oz (170g) pure white chocolate
- 1 teaspoon (5g) coconut oil
- ¼ teaspoon matcha powder
- blue gel food coloring
Cocoa Speckles:
- 1 teaspoon (2g) cocoa powder
- 2 teaspoon (10ml) hot water
Instructions
- Read this post here for more details on how to make water ganache for water chocolate truffles.
- Make the chocolate yolk filling. Chop up the chocolate very finely so it melts quickly and evenly. Place the chocolate in a heatproof bowl. Bring a cup of water to a full boil. Measure out 2 tablespoons (30 ml) and pour it over the chopped chocolate. Cover and let stand for 1 minute, then whisk gently until completely smooth and glossy. If the chocolate is not completely melted because it is cold in your kitchen, heat it again GENTLY by placing the bowl in the microwave for just 10-20 seconds at medium power until smooth, thick and glossy, or set it over a pot with simmering water (a double boiler if you are using a metal bowl). It is very easy to over-heat warm ganache, so be cautious. You will know it is emulsified when it looks tight, smooth, thick and glossy with not signs of separation.
- Let the ganache cool uncovered at room temperature for 30 minutes until it is no longer warm, then cover the bowl tightly with plastic wrap and leave it at room temperature for at least 2 hours to fully set. Do not refrigerate.
- Once set, use a teaspoon or a melon baller to scoop up small teaspoons of ganache, use your fingers to mold and shape it so it is pliable, then roll into smooth balls. Place them back on the parchment and into the freezer to harden for at least 15 minutes.
- Make the peanut butter filling. Combine peanut butter, maple syrup, almond flour, powdered sugar (if you prefer it a bit sweeter) and salt in a medium bowl and mix well until combined. Place the bowl in the freezer to chill for 15 minutes so it is easier to work with.
- Scoop up heaped tablespoons of the filling and roll each one into a smooth ball using your hands. Then, use your hands to flatten the ball and place a frozen truffle in the middle. Wrap the peanut butter around it and then shape it into an oval with a tapered end to resemble and egg.
- Place the eggs on a parchment paper-lined baking sheet and put the tray in the freezer while you prepare the coating. It is important that the eggs are very firm or it will be a challenge to dip and coat them.
- Dip the eggs. Add the chopped white chocolate and coconut oil to a heat-safe metal bowl. Set it over a pot with simmering water (a double boiler) and stir constantly until completely melted and smooth. Stir in the food coloring and adjust colors as desired. Pour it out into a drinking glass or jar with a wide mouth so that the chocolate is deep and it is easier to submerge the egg.
- Coating the eggs works best when they are chilled so that the chocolate firms up quickly and doesn't pool when you set it down on the baking sheet. Use a thin dessert fork to skewer the bottom of an egg and then dip it into the melted chocolate. Tap the fork on the edge of the cup to let any excess chocolate drip off and then transfer the egg to a piece of parchment to set. I like to use another fork or a skewer to help release and push the egg off of the fork that's holding it, then I gently lift it up so it is sitting upright. Set aside until the chocolate sets up firm.
- Decorate with speckles. Combine cocoa powder and hot water in a small bowl. Whisk until combined. Dip the tip of a dry pastry brush or new (clean) paint brush into the cocoa mixture and shake off any excess. Hold the brush about 3 inches away from the eggs, then use your pointer finger to pull the bristles back and slowly release to "flick" the cocoa over them. Repeat as many times as you'd like to create the pattern. Note: this can be slightly messy, so do it over a large work surface and wear an apron. The eggs are ready to enjoy!
