Flaky All Butter Raspberry Peach Pie
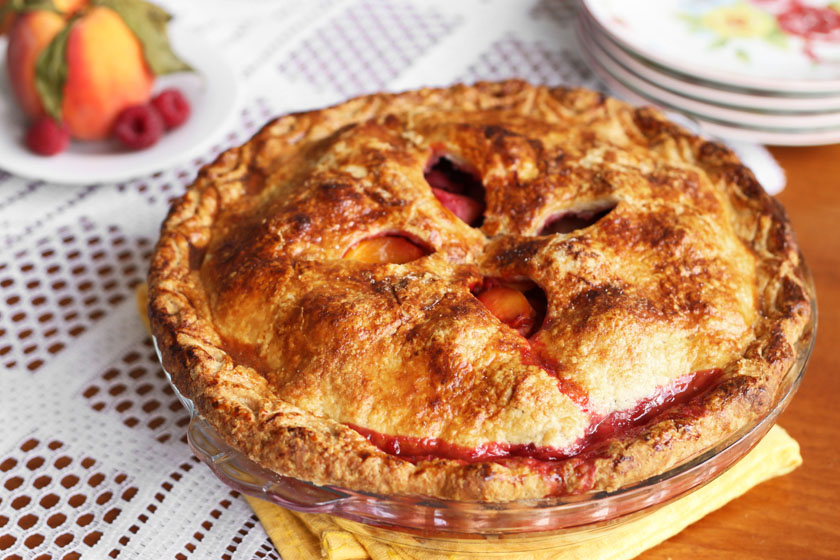
Making this pie is my ode to Summer with its peaches and raspberries, and simultaneous welcome to Fall with it just being pie.
Let's face it - pie is work.
I try to tell people it's not that hard because I truly believe it isn't.
Then I recently took the time to show my mother-in-law how to make pie from scratch. We started the night before so that the pastry had time to rest over night (more on that later). The usual protocol: cold butter, toss, rub, cut-in, pea-sizes, cold water, press together, wrap up, refrigerate. I used the steam-roller method that I describe in my cookbook which makes the ultimate flaky pie dough by literally forming flattened discs of butter that get held together by flour to make a shaggy dough.
The next day I start rolling. Half for the bottom layer, half for the top. Dust the work surface and dough with flour as you go to prevent sticking. And as she's slicing up 3 lbs of fruit she says "Pie is a lot of work, man!"
Homemade pie is 25 million times better than shop-bought and it is 110% worth the effort.
The truth is that it really is not that hard. BUT, it requires time and likely some decent clean up if you are like me and make your dough right on the counter top. Flour is probably everywhere.

When you think of pie, what's the first thing that comes to mind? For me - FLAKY.
And the #1 rule for making flaky pastry: make it COLD and bake it HOT!
That means:
Keep the fat cold.Keep your hands cold.Keep the bowl cold.Keep the oven HOT.
Flaky pastry requires pliable solid fats so the trick is to avoid melting. Melted fat becomes oily, leaks water and tends to stick to the dough.
Let's recap the steps to making flaky pastry:
Step 1. Cut cold butter into small cubes.
Step 2. Combine flour, sugar and salt in a bowl.
Step 3. Using both hands, rub about 2 tablespoons of cold fat into the flour with your fingertips so it is well dispersed and the mixture looks like damp sand.
Step 4. Add remaining cold fat and use a pastry cutter (this is my all-time favourite one - it is strong and fits comfortably in the hand) to mince the butter into smaller pieces. If using your hands, press the butter between your thumbs and forefinger + middle finger to break it up into small bits about the size of hazelnuts or peas and flatten some pieces out too.
Step 5. Grab a fork and gently toss the mixture while you sprinkle in ice cold water just until the mixture starts to hold together in clumps but doesn't get soggy.
Step 6. Press it all into a ball, turninig it over onto itself one or two times if necessary, and then flatten into a disc.
Step 7. Wrap with plastic and chill at least 2 hours.

The aim of Step 3 is tenderness - finely dispersing some of the fat evenly into the flour so that it is well dispersed will coat and separate small particles of flour from each other (like a moisture barrier) to achieve a tender texture. This serves to protect wheat proteins from linking up to form gluten which would make the pastry too strong and chewy like bread dough. Instead it will be crumbly and tender. It will also prevent it from absorbing too much liquid which can lead to a soggy crust.
But, we don't just want tender. We want FLAKY.
The purpose of Step 4 is to incorporate cold butter into the flour so that it ends up looking like rubble. Larger bits of fat will flatten out as you roll the pastry and create layers that separate stronger dough. That leads to flakes. On the other hand, if the fat bits are too large then they will just melt and leave gaping holes in the pastry - not a good scene. Aim to have most of the cold fat incorporated rather well and evenly dispersed with a few larger bits no bigger than the size of hazelnuts. It also helps to put the bowl with the cut-up fat and flour into the freezer for 5 minutes before adding any liquid.
Dribble cold liquid into the dough until it comes together to form a mass but does not form a smooth ball. Pie dough knows no smoothness because that means it is over-worked, tired and not-so-flaky. Wrap it up in plastic wrap and let it chill in the fridge for at least 2 hours to firm up the fat and hydrate the flour.
If you are using part lard or shortening, then there is more room for error since these fats contain no moisture (remember butter is only 82% fat and melts at a lower temperature than lard or shortening).
Use only enough liquid as it takes to make a shaggy but cohesive dough. Too much water will promote gluten formation and elasticity.

Let's take a closer look at some key ingredients:
Lard or shortening (trans fat free please)
Fat tenderizes because it is insoluble in water, so it coats flour particles and prevents them from cross-linking and forming a gluten network. Shortening and lard have a higher melting profile than butter. That means that it will withstand the temperature of your fingers (because you are making the dough by hand, right?) and resist melting more so than butter. This provides more insurance that your fat will remain solid in the dough, and solid fat is required for flakiness.
Butter
Butter adds unmatchable flavour to pastry. Bottom line - butter is better, so never replace all of the butter with alternative fat in a recipe because shortening is essentially flavourless and butter is sensational. Making pie dough is a balancing act between function and flavour.
Acid
Lemon juice or white vinegar will lower the pH (increase the acidity) of the dough. Acidity may interfere with bond formation between gluten proteins in the flour, resulting in a softer, more tender texture.
Why rest and chill pie dough before rolling and baking?
Resting the dough in the refrigerator will firm up the fat and allow the water to become absorbed and more evenly distributed. This makes the dough easier to work with. Rolling chilled dough will press solid fat into flattened sheets which separates flattened layers of dough for flakiness. The end result is a laminating effect with layers of flour aggregates that are mostly untouched by the fat alternating with layers of fat particles embedded with flour. Some gluten develops in the layers of flour and the fat layers melt upon baking to leave spaces between sheets of dough.
What temperature should you bake your pie?
Initially it is important to bake the pie at a very high temperature (400-425 degrees F) to both set the dough layers before the fat melts completely and to set the crust before the fruit filling makes it soggy. This rapid heating also causes the ~16% water in the butter to evaporate so that the steam separates dough layers.
How to get that golden pie crust?
Whatever you do, don't go to the effort of making a lovely pie and then not brush the crust with egg. What a shame that would be! An egg wash is the ultimate signature of home-baked pie. A whole egg will do, but for that ultimate golden shiny crust, combine one yolk with 2 teaspoons of water or milk and brush it lightly all over the surface just before baking.
You are ready. Make that pie! Make it easy.
All-Butter Raspberry Peach Pie
Ingredients
For the crust:
- ⅔ cup 150g cold butter, cut into ¾-inch pieces
- 3-4 tablespoon ice cold water
- 1 tablespoon lemon juice
- 1 ¾ cups 250g all-purpose flour
- 2 tablespoon 25g granulated sugar
- ½ teaspoon salt
For the filling:
- 2 ½ lbs peaches 6-8 large peaches
- ¼ cup plus 1 tablespoon granulated sugar divided
- ¼ cup packed light brown sugar
- 2 tablespoon corn starch
- 2 tablespoon all-purpose flour
- ½ teaspoon ground cinnamon
- ¼ teaspoon ground ginger
- pinch ground clove
- 4 oz fresh raspberries about 1 cup
For topping:
- 1 large yolk
- 2 teaspoon milk
- 1 teaspoon granulated sugar
Instructions
- To make the crust, first place the butter in the freezer for 10 minutes. Mix together ice cold water and lemon juice and place in the freezer.In a large bowl, whisk together flour, sugar and salt. Add about 3 tablespoons of the cold butter and rub it into the flour mixture rapidly using your fingertips until it resembles coarse crumbs. The butter should be well dispersed so that the mixture feels mealy and the flour is less dusty. Add the remaining cold butter and toss in flour mixture to coat. Using a pastry blender or a bench scraper, cut the fat into flour to break it down to hazelnut or marble-sized pieces. Turn this crumbly mixture out onto a clean work surface and use a rolling pin to roll over the whole mixture in several rocking motions to flatten pieces of fat into thin discs or sheets. Be sure to go over all portions of the dough. Scrape down the rolling pin and gather the mixture into a pile using the bench scraper. Repeat this process 3 or 4 more times until most of the flour is incorporated into the fat and the dough looks shaggy. You'll notice that there is very little dusty flour. Run your bench scraper over the entire mixture in a chopping-like motion to break down any excessively large pieces of fat. Scoop this crumbly dough back into the bowl and place the bowl in the freezer for 10 minutes to allow the fat to firm up.
- Gradually sprinkle water/lemon juice mixture over the chilled shaggy dough, one tablespoon at a time, while gently tossing with a fork until the dough is moistened and it barely clings together in clumps. The dough will hold together when squeezed or pressed when it is ready, but it should not form a ball. Turn dough out onto a clean surface and bring it together with your hands slightly cupped, turning it frequently and pressing firmly to hold in loose bits until it is cohesive and forms a mass, but is not completely smooth. Fold the dough over itself one or two times to bring it together if necessary. Separate slightly more than one-third of the dough (for the top crust) and press each portion firmly to form a roughly-shaped ball. Flatten each one into a disk, wrap well with plastic wrap and refrigerate at least 2 hours or overnight.
- On a lightly floured work surface, roll the larger half of dough into a 12 to 13-inch circle, rotating the dough and adding more flour as necessary to prevent sticking. Carefully drape the dough over an 8x2-inch pie dish. Gently press it into the bottom edges and up the sides of the dish. Refrigerate until firm, about 15 minutes, while making the filling and rolling out the top crust. This allows the rolled layers of gluten and fat to relax, creating a more flakey crust.Once the bottom crust is chilled, begin to roll out the other portion of dough into a 10 to 11-inch wide round. Add sugar mixture to the bowl with the peaches and fold them together until evenly blended.
- To peel peaches, first bring a large pot of water to a boil and fill a large bowl with cold water and 2 cups of ice cubes. Use a paring knife to score a small 'x' at the base of each peach and lower them into boiling water with a large slotted spoon or skimmer. Blanch them by boiling until the skins are loose, about 30-60 seconds, depending on the ripeness of each peach. Use a slotted skimmer to transfer peaches to ice water and submerge to stop cooking, about 1 minute. The skins should now slip off the peaches very easily. Starting from the scored x, peel each peach, cut them in half, remove the stones and slice them into just under ¼-inch crescents. Place the sliced peaches in a large bowl and set aside.Whisk together ¼ cup granulated sugar, brown sugar, corn starch, flour and spices until no lumps remain and set aside. You will fold this together with the peaches immediately before filling the pie.When ready to bake, preheat your oven to 425°F and place a baking sheet on the bottom rack.
- Spoon the mixture into chilled pie crust, tucking it in gently to fill all the spaces (this will prevent your pie from shrinking too much once it cools). Gently toss raspberries with remaining 1 tablespoon of sugar and scatter them over, around and under the peaches. In a small bowl beat egg yolk with milk until blended and lightly brush it around the edges before carefully draping the chilled top crust over the filled pie. Press edges of top crust against bottom crust edges to seal. Trim off excess dough around the edges leaving a ½-inch overhang and then tuck it in by rolling it underneath itself (the top and bottom crust together) so that it sits against the edge of the pie dish. This ensures a tight seal on your pie.
- Using a large dessert spoon, hold it upside down (convex side facing up) make crescent-shaped indentations all around the edge. Place the pie in the freezer for 15 minutes.Lightly brush the top and edges of the chilled pie with egg wash and sprinkle all over with sugar. Place pie on baking sheet and bake on bottom rack of oven for 20 minutes. Reduce oven temperature to 350°F and bake until juices have been bubbling for at least 5 minutes, about 40 minutes longer. Transfer pie to a wire rack and let cool completely before slicing.