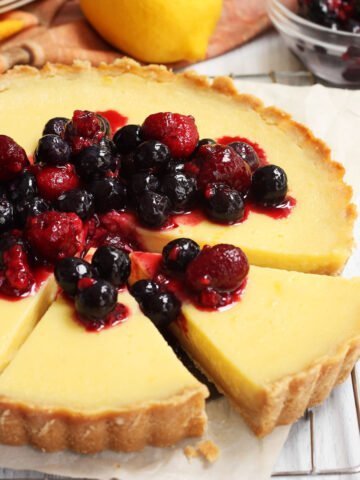
Dark Chocolate Raspberry Tart
If you're looking for a show-stopping dessert, this Dark Chocolate Raspberry Tart is it with a flaky buttery chocolate pastry crust and rich, silky smooth dark chocolate filling studded with juicy fresh raspberries. It's topped with piles of fresh raspberries and dark chocolate shavings. The filling doesn't require any baking, so once you've made the crust it is an easy job after that. The texture is so incredibly smooth that it's almost like ice. It's certainly and impressive dessert that shows off fresh berries and dark chocolate in its purity. If you love the combination of chocolate and raspberries, check out my Dark Chocolate & Raspberry Sour Cream Cake and Raspberry Cheesecake Brownies as well.

WHY THIS RECIPE WORKS
- Tender and flaky chocolate pastry - this pastry crust has just the right balance of tenderness and structure to hold up to a no-bake filling.
- Smooth dark chocolate ganache filling - the filling is easy to prepare and doesn't require any baking. It is so silky smooth.
- Rich chocolate flavor - you can be sure that this is a recipe for chocolate lovers. There is plenty of chocolate here.
- Not too sweet - the blend of bittersweet and semisweet chocolate makes this tart perfectly sweet while still having intense chocolate taste.
- Fresh raspberries - I love this recipe for how well it showcases fresh raspberries as they do not get cooked. They are tart and sweet and make such a nice complement to dark chocolate.

INGREDIENTS FOR DARK CHOCOLATE RASPBERRY TART
Here are some notes on some of the key ingredients for this recipe. For a full list of ingredients and measurements, scroll down to the recipe card at the bottom of this post.
- Bittersweet chocolate - this is chocolate with minimum 70% cocoa solids.
- Dark chocolate - this is chocolate with between 50 and 55% cocoa solids.
- Cream - you'll need cream with 35% milk fat which is also called heavy whipping cream.
- Honey - this will give the ganache a glossy finish and also contribute to that silky smooth texture.
- Sugar - this is optional if you prefer sweeter chocolate.
- Salt - salt is so important to enhance the chocolate taste!
- Flour - regular unbleached all-purpose flour works great for pastries. If you have pastry flour, you can also use that but it is not necessary especially since the flour will be cut with cocoa powder.
- Cocoa powder - you can use natural or Dutch process cocoa, but if you prefer a darker looking crust, Dutch cocoa works well here. This is the one I prefer here.
- Butter - unsalted butter or salted butter works for the pastry. If you use salted butter, then you can omit the added salt.
- Egg - I use a whole egg for this pastry as opposed to just the yolk for when I make blonde pastry. Since cocoa powder doesn't have as much structure-building properties as flour, the egg proteins will help with this so that the crust has some stability and isn't too crumbly.


STEP BY STEP INSTRUCTIONS
- STEP 1). Make the pastry. Combine dry ingredients. Combine flour, cocoa powder, sugar and salt in a medium bowl and whisk to blend evenly.
- STEP 2). Blend in the butter. Add the cold pieces of butter and rub them in with your fingertips or use a pastry cutter until they are broken down to small pieces the size of oat flakes. There shouldn't be large pieces of butter left, but also try not to over-work it so that you don't heat it up from the warmth of your hands. Having the butter well dispersed will make a tender crust.
- STEP 3). Incorporate the egg and bring it together. Beat the egg well in a small bowl and then drizzle it into the bowl while tossing the dry mixture with a fork. Once you have added all of the egg, turn the mixture out onto a work surface and bring it together with your hands slightly cupped to press the dough together. Do not knead the dough, but you can fold it over itself a few times to bring it together and press in loose bits.
- STEP 4). Chill the dough. Wrap it well with plastic wrap and refrigerate for at least 2 hours or overnight.
- STEP 5). Roll out the dough. Roll it out to between ⅛ and ¼ inch thickness. Dust the surface of the dough lightly with flour as necessary to prevent sticking, then lightly brush off excess flour once you roll it out to the correct thickness. Transfer it to a 9-inch round tart pan with removable bottom. Press the dough evenly along the base and up the sides of the pan, folding over the overhanging dough to reinforce the edge crust. Bake until the pastry looks matte and feels dry to the touch. Transfer pan to a wire rack to cool.
- STEP 6). Make the filling. Place both types of chopped chocolate in a heatproof bowl and set aside. Combine cream and honey in a small saucepan over medium-low heat and bring it to a simmer. Remove from heat and immediately pour it over the chocolate. Add sugar (if you are using it) and salt and whisk until completely melted, smooth and glossy. Let it cool for 10 minutes so that it doesn't cook the raspberries.
- STEP 7). Fill the pastry crust. Scatter 1 cup of fresh raspberries over the cooled crust and pour over the chocolate ganache. Set aside in a cool place to set for about 1 hour. You can refrigerate it to speed up the process. Top with plenty of fresh raspberries before serving.

EXPERT TIPS
- Do not over-work the pastry. The pastry dough mixture will look more shaggy than cohesive when you turn it onto the surface. As you bring it together with your hands you will see there is enough moisture. A good way to tell this is by taking a handful and making a fist to press it together in your hands. If it holds together and you see your knuckle marks in it, then it is moist enough.
- Definitely chill the pastry. If you try to roll pastry immediately, it will not roll out as smoothly and will be quite sticky. You also will not get the flakiest results. As pastry rests in the fridge, the flour has time to hydrate further and the gluten proteins align so that they don't retract when you roll it. The butter also firms up so that it doesn't melt into the dough before baking which would make the dough tacky.
- Do not over-mix the filling. Ganache is so easy to make but can be ruined if you over-mix it especially using a whisk. If over-whisked, the fat from the cream and chocolate can separate and cause it to look grainy. Just use a whisk in a stirring motion making concentric circles from the center and working your way out to the edges until you see it emulsifying into a smooth glossy mixture.
- Chop the chocolate finely. The smaller the pieces of chocolate, the more evenly and quickly the chocolate will melt.
- Let the chocolate melt slowly. Once you add the hot cream, cover the bowl and let the mixture stand for 2 minutes to let the heat gently melt the chocolate before stirring. This will create the smoothest emulsion as heat penetrates the chocolate so that it is already mostly melted when you start to stir.
- Stir gently as this will ensure the chocolate and cream form a homogeneous emulsion that won't split. Vigorous stirring will incorporate air and can break the emulsion, leaving you with an oily curdled-looking mess.
- Use a bit of honey or corn syrup in the filling. This is a baker's secret for creating a beautifully glossy finish.
- Use a high quality chocolate - one that you prefer to eat. Since the filling is mostly made of chocolate, it is important that it has a nice taste.

RECIPE FAQ
For this recipe you should absolutely use dark chocolate. I blend half bittersweet chocolate with half semisweet chocolate to land on a cocoa content of around 63% which makes a perfectly intense chocolate taste that isn't too bitter. Also darker chocolate is often made with a higher quantity of cocoa butter which will create a silkier texture and firmer set.
Yes, you can use brown sugar in the filling if you prefer.
If you have a sweeter palate, then there is an option to add up to 2 tablespoons of sugar into the ganache. I don't do this when using this 50/50 blend of chocolate, but it really depends on your personal taste.
This chocolate ganache filling for this tart is set when it starts to look more matte (but it will still have a sheen). If you touch it, it will feel firm but still give way to slight pressure.
You can place it in the fridge to set if you want to speed it up, but I find it has the smoothest texture when you let it set slowly in a cool place.
This tart should be stored in the fridge since there are fresh raspberries that need to be kept chilled.

STORING & SERVING
This tart should be stored in the fridge since there are fresh raspberries that need to be kept chilled.
This tart is best served at room temperature. It is also delicious cold, but it will have a firmer texture. It's so delicious that it needs nothing else, however a dollop of fresh whipped cream or scoop of vanilla ice cream wouldn't hurt! I would totally encourage it.


Baking with raspberries
Looking for more delicious recipes with raspberries? Try these:
Craving chocolate
Here are more decadent chocolate recipes:


If you love chocolate, check out these recipes!
Mint Chocolate Brownies Easy Chocolate Cream Pie Olive Oil Brownies with Date Fudge Frosting The BEST Flourless Chocolate Cake Outrageous Fudgy Chocolate Chip Cheesecake Brownies The BEST Small Batch Fudge Brownies Homemade Cosmic Brownies Recipe!Video
Dark Chocolate Raspberry Tart

Ingredients
Pastry:
- 1 cup 142g all-purpose flour
- ¼ cup 21g cocoa powder (I prefer this one)
- 3 tablespoon 40g granulated sugar
- ¼ teaspoon salt
- 7 tablespoon 100g cold unsalted butter
- 1 large cold egg well beaten
Filling:
- 4 ¼ oz 150g bittersweet chocolate with 70% cocoa solids (I like this one)
- 4 ¼ oz 150g semisweet dark chocolate with 50% cocoa solids
- 1 ¼ cups 300ml 35% heavy whipping cream
- 1 tablespoon 15ml honey
- 2 tablespoon 25g granulated sugar (optional)
- ⅛ teaspoon salt
- 1 cup 120g fresh raspberries plus 1 cup extra for topping
Instructions
- Make the pastry. Combine flour, cocoa powder, sugar and salt in a medium bowl and whisk to blend evenly. Add the cold pieces of butter and rub them in with your fingertips or use a pastry cutter until they are broken down to small pieces the size of oat flakes. There shouldn't be large pieces of butter left, but also try not to over-work it so that you don't heat it up from the warmth of your hands. Having the butter well dispersed will make a tender crust. Beat the egg well in a small bowl and then drizzle it into the bowl while tossing the dry mixture with a fork. Once you have added all of the egg, turn the mixture out onto a work surface and bring it together with your hands slightly cupped to press the dough together. Do not knead the dough, but you can fold it over itself a few times to bring it together and press in loose bits. Wrap it well with plastic wrap and refrigerate for at least 2 hours or overnight.
- Preheat the oven to 375°F. Place the chilled dough onto a lightly floured work surface and roll it out to between ⅛ and ¼ inch thickness. Dust the surface of the dough lightly with flour as necessary to prevent sticking, then lightly brush off excess flour once you roll it out to the correct thickness.
- Gently drape the dough over rolling pin and transfer it to a 9-inch round tart pan with removable bottom. Press the dough evenly along the base and up the sides of the pan, folding over the overhanging dough to reinforce the edge crust. Trim away any excess dough around the sides then prick the base a few times with a fork. Optional: crumple a piece of parchment paper and place it over the crust. Pour in baking beads or dried beans.
- Bake for 15 minutes, then lift up the parchment to remove the baking beads and bake for another 5 minutes until the surface looks dry and matte. If not using baking beads, bake for 15 minutes at 375°F and then reduce oven temperature to 350°F and bake for another 5-10 minutes until the pastry looks matte and feels dry to the touch. Transfer pan to a wire rack to cool.
- Make the filling. Place both types of chopped chocolate in a heatproof bowl and set aside. Combine cream and honey in a small saucepan over medium-low heat and bring it to a simmer. Remove from heat and immediately pour it over the chocolate. Add sugar (if you are using it) and salt, cover the bowl and set aside for 2 minutes. Uncover the bowl and whisk gently until completely melted, smooth and glossy. Let it cool for 10 minutes so that it doesn't cook the raspberries.
- Assemble the tart. Scatter 1 cup of fresh raspberries over the cooled crust and pour over the chocolate ganache. Set aside in a cool place to set for about 1 hour. You can refrigerate it to speed up the process. Top with plenty of fresh raspberries before serving.


If I bake and freeze these tart shells, should I gently reheat them and let them cool before filling? I was thinking that if I didn't reheat, the texture would be affected.
Hi Terri! You can freeze the baked tart shell. Just ensure it is in an airtight bag and then let it thaw at room temperature on a wire rack. You will likely not need to reheat the shell if it is still dry and crisp.
Can you make this into tartlets instead of one 9in tart?
Hi Keelee, yes you could! I would try to follow the instructions for my White Chocolate Raspberry Tarts but follow the recipe for this one.
How far ahead of time can you make this without it causing a soggy bottom from the raspberries?
Hi Toni, you can make it the day before.
Any advice on what to do if you don’t have a 9in tart pan? I have either an 11in tart pan, or a 9in springform pan. I’m reluctant to use the 11in tart pan, because there won’t be enough dough…
Hi Brett, you can certainly use your 9-inch springform pan. Just press the crust up the sides about an inch. Line the base with parchment too.
This is amazing! Someone stated going “back for slivers” Yup it’s how it was eaten in my home. This is now my go-to dish to bring to food gatherings!
Thanks Kate! I always go back for "slivers" lol
This tart is dangerously good. I keep going back for a "sliver" and by the evening it was half gone!
Hi JJ, I can totally relate to the "sliver" thing. LOL
What a beautiful tart! Everyone sent to many compliments.
Thanks Harshel!
This is so rich and decadent. It was exactly what I wanted/needed.