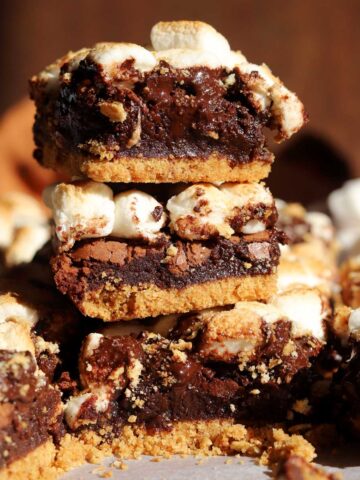
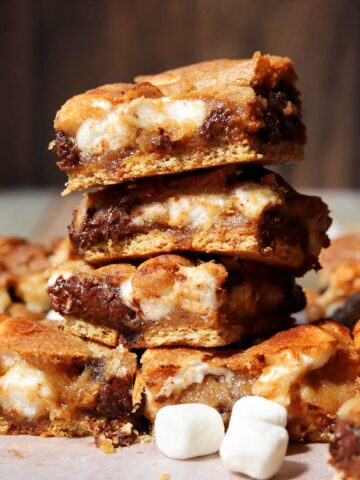
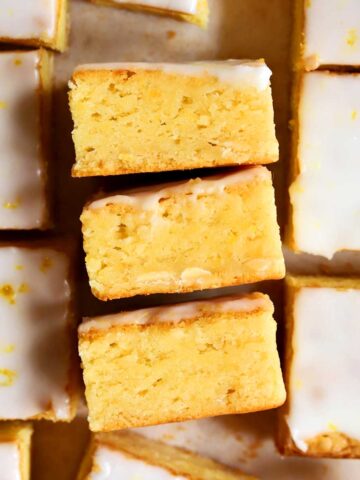
Peanut Butter S'mores Bars
These soft and chewy Peanut Butter S'mores Bars are incredibly delicious with so many layers of flavor and texture. They're perfect to make during Summertime when the theme for desserts is all about S'mores, even though I make them all year long. This recipe starts with making your own homemade soft graham cracker cookie dough. It's a cinnamon-spiced honey whole wheat cookie dough base with layers of milk chocolate, peanut butter and gooey toasted marshmallow. They are simple to make and highly addictive. If you love s'mores, then you might find yourself eating out of the pan especially while still warm and gooey, but they are even better cold from the fridge when the layers all set up nicely. If you love s'mores desserts, try my soft S'mores Cookies, S'mores Icebox Cake and this easy no-bake S'mores Bark too!

WHY THIS RECIPE WORKS
- Easy recipe - these s'mores bars are very simple to make with melted butter in a few easy steps. You don't need a mixer and you can easily make these with a spatula in a large bowl.
- Soft & chewy graham cracker cookie dough - the touch of honey, whole wheat flour and hint of cinnamon in the cookie dough makes these bars taste just like graham crackers and it is so soft and chewy. The middle pieces bake up slightly fudgy while the edges are extra chewy and deeply browned.
- Milk chocolate layer - two full milk chocolate bars bake right into this dessert between the cookie dough and the peanut butter layer.
- Pure peanut butter - peanut butter melts and mingles with the chocolate as it bakes all together.
- Toasted marshmallow - we toast up the marshmallow layer for extra flavor before completing the bars and baking thoroughly. It makes them extra tasty!
- No actual graham crackers needed since the dough IS a graham cracker cookie dough.

INGREDIENTS FOR PEANUT BUTTER S'MORES BARS
Here are some notes about the ingredients. For a full list of ingredients, check out the recipe card at the bottom of the page.
- Butter - you need soft butter to make the cookie dough base. Unsalted or salted butter works here. In fact, I really like salted butter to counteract the sweetness from the marshmallows.
- Brown sugar - light brown sugar or dark brown sugar will work for this recipe. I prefer light brown sugar for its milder taste so that it doesn't overpower the honey.
- Honey - this is what makes the bars taste like graham crackers. Honey will add flavor but it also makes them super soft and chewy since it binds moisture.
- Egg - you'll need one egg yolk for this recipe, so save the white for another use. A whole egg would add too much moisture since the pumpkin already brings a lot of water, and it would otherwise make these bars too cakey.
- All purpose flour - regular unbleached all-purpose flour is great for these soft and chewy cookies.
- Whole wheat flour - traditional graham crackers are made with graham flour which is hard to find these days, so whole wheat flour is the best substitute and it tastes so good here!
- Cinnamon - a bit of sweet spice makes these taste like graham crackers!
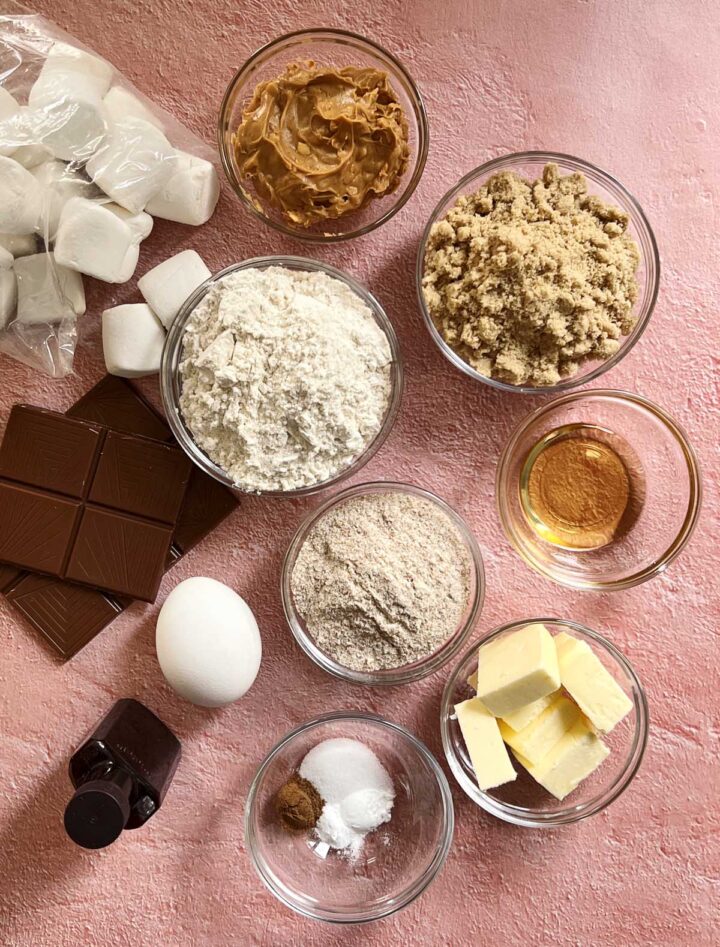
- Pure vanilla extract - vanilla is a lovely back note to the honey and cinnamon flavors. I like this Madagascar Bourbon Vanilla extract.
- Marshmallows - use regular size marshmallows, but you can also use minis.
- Chocolate - classic s'mores use Hershey's milk chocolate. You can use two bars of chocolate or these milk chocolate chips. I also love dark chocolate with my s'mores to balance the sweetness. You can use semi-sweet chocolate chips if that is all you have on hand. They will still taste great!
- Sea salt - flaky sea salt is completely optional, but it really takes these to a whole new level! It balances the sweet marshmallows and complements the chocolate. I highly recommend it!

STEP BY STEP INSTRUCTIONS: HOW TO MAKE PEANUT BUTTER S'MORES BARS
- STEP 1). Combine butter and sugar. Combine soft butter, brown sugar, honey and vanilla in a large bowl and mix well using a handheld mixer or a wide rubber spatula until smooth and a bit fluffy.
- STEP 2). Mix in egg. Add the egg and vanilla and mix well until evenly combined.
- STEP 3). Add dry ingredients. Sprinkle over both types of flour, baking powder, cinnamon, baking soda and salt, then fold it all in until evenly incorporated. The dough will be soft.
- STEP 4). Layer it up. Press ⅔ of the dough into the bottom of the baking pan. The dough will be a bit sticky so use floured hands to make an easier job of it or use a small offset spatula to smooth it out. Place the chocolate bars over the dough to cover the surface evenly and press them down gently. They should make an even layer in an 8×8 pan. Melt the peanut butter for about 30 seconds in the microwave and drizzle it over the chocolate bars.
- STEP 5). Toast the marshmallows. Scatter marshmallows on top, place in the oven for 3 minutes to melt marshmallows then turn on the broiler for just 1 minute! Keep an eye on them until they are toasted. Pull it out and immediately smash them down and try to spread them around a bit but it will be super sticky. Use an oiled offset spatula to help.
- STEP 6). Add the top layer of dough. Divide the remaining dough into 4 portions and use a much flour as you need to flatten them into sheets and drape over the marshmallows to cover as much as you can but it's ok and encouraged to have marshmallow peaking through.
- STEP 7). Bake. Bake for 20-25 minutes or until golden brown on top. Let cool for at least 1 hour for the easiest slicing and use a lightly oiled knife so the marshmallow doesn't stick.

EXPERT BAKING TIPS
- Use very soft butter so it blends evenly and smoothly with the peanut butter.
- Measure out the honey accurately as too much will make the dough too soft and it will brown too quickly.
- Measure the flour accurately to ensure you get the right texture. Too little flour will mean the dough is too soft and too much flour will make the bars dry instead of soft and chewy.
- Use floured hands to flatten and shape the soft dough for the top layer.
- Let the bars cool completely for neat slices, and then slice with a hot, dry and oiled knife so the marshmallow doesn't stick. Wipe the knife clean between each slice.

RECIPE FAQ
Yes! Salted butter will be fine. In this case I would suggest to use a level ¼ teaspoon of salt instead of a heaped ½ teaspoon.
Yes, any type of peanut butter works since it is added as a single layer rather than incorporated into the cookie dough. Regular or natural peanut butter works well, and it can be either smooth or chunky.
These bars are best stored at room temperature in an airtight container for up to 5 days. They stay nice and soft and chewy!
Yes, you can freeze these bars. First let them cool completely, then slice them into squares and place them in a resealable freezer bag. You can keep them frozen for up to 3 months, and if you want them to keep longer, wrap them individually in plastic wrap before placing in the freezer bag.

If you love cookies and cookie bars, check out these recipes!
The BEST Chewy Pumpkin Cookies Chewy Brown Butter Snickerdoodles Cookies Brown Butter M&M Cookies Recipe Lemon Blueberry Cookies with White Chocolate Chunks Coffee Pecan Chocolate Chip Cookies Double Peanut Butter Chocolate Chunk Cookies Hazelnut Double Chocolate Chunk Cookies THE BEST Chewy Chocolate Chip Cookies – Bakery Style!Summer theme...
Looking for more recipes with a Summer vibe? Try these:
Bars & Squares
Here are more easy bars & squares recipes to try:
Video
Peanut Butter S'mores Bars

Ingredients
- 6 tablespoon (84g) unsalted butter, softened
- ½ cup plus 1 tbsp (125g) packed light brown sugar
- 1 large egg, at room temperature
- 1 tablespoon (15ml) honey
- 1 teaspoon (5ml) pure vanilla extract
- 1 cup (142g) all-purpose flour
- ½ cup (71g) whole wheat all-purpose flour
- ½ teaspoon salt
- ¼ teaspoon baking powder
- ¼ teaspoon ground cinnamon
- ⅛ teaspoon baking soda
- 2 x 100g milk chocolate bars (or 200g milk chocolate chips)
- ½ cup (120g) regular smooth or crunchy peanut butter
- 21 regular sized marshmallows
Instructions
- Preheat the oven to 350°F. Line an 8x8-inch square metal baking pan with parchment paper leaving a 2-inch overhang at each side and secure the sides down on the edge of the pan with ¾-inch binder clips.
- Combine soft butter, brown sugar, honey and vanilla in a large bowl and mix well using a handheld mixer or a wide rubber spatula until smooth and a bit fluffy. Add the egg and vanilla and mix well until evenly combined.
- Sprinkle over both types of flour, baking powder, cinnamon, baking soda and salt, then fold it all in until evenly incorporated. The dough will be soft.
- Press ⅔ of the dough into the bottom of the baking pan. The dough will be a bit sticky so use floured hands to make an easier job of it or use a small offset spatula to smooth it out.
- Place the chocolate bars over the dough to cover the surface evenly and press them down gently. They should make an even layer in an 8×8 pan. Alternatively you can sprinkle chocolate chips evenly over the surface. Melt the peanut butter for about 30 seconds in the microwave and drizzle it over the chocolate bars.
- Scatter marshmallows on top, place in the oven for 3 minutes to melt marshmallows then turn on the broiler for just 1 minute! Keep an eye on them until they are toasted. Pull it out and immediately smash them down and try to spread them around a bit but it will be super sticky. Use an oiled offset spatula to help.
- Divide the remaining dough into 4 portions and use a much flour as you need to flatten them into sheets and drape over the marshmallows to cover as much as you can but it's ok and encouraged to have marshmallow peaking through.
- Bake for 20-25 minutes or until golden brown on top. Let cool for at least 1 hour for the easiest slicing and use a lightly oiled knife so the marshmallow doesn't stick.
- NOTE: for the neatest slices (and the least amount of gooey mess), let the bars cool for at least 8 hours and wipe the knife clean between each slice.
Not only were these delicious, but the recipe was easy to follow. They came out perfect and they were gobbled up before the end of the day!
Thanks for the feedback Stephanie! Glad you enjoyed the recipe 🙂
this sounds so good! what could i use instead of whole wheat flour? would all purpose flour work?
Hi Jenny! Yes you can but you will miss out on some of the "graham" flavor.
I can't wait to make these. They look delicious! Can you make them as regular smores bars without peanut butter? Thank you!
Hi Amanda! Yes you can leave the peanut butter out of the recipe.
These were so good! I used brown butter to make it a bit toastier and then added caramel (using Scientifically Sweet's wet caramel sauce recipe). Since I added caramel which made it sweeter, I opted for dark chocolate instead of milk. Delicious!!! And so easy! Hardest part was waiting for it to cool/set before trying it lol
Hi Lauren, omg that sounds incredible! I'm so glad you enjoyed it and I love how you added the caramel.
Only thing I did wrong was not making a double batch! These are SO good!
Thanks Britt! Glad you enjoyed them.
These look soooo good !
Can I check, when you say to use a large egg, what kind of weight is that? I think egg sizes in the UK are different, so I just want to make sure I get the right equivalent.
Thanks 🙂
Thank you Steph! They are approx 57g with shell.
Only thing I did wrong was not making a double batch! These are SO good!