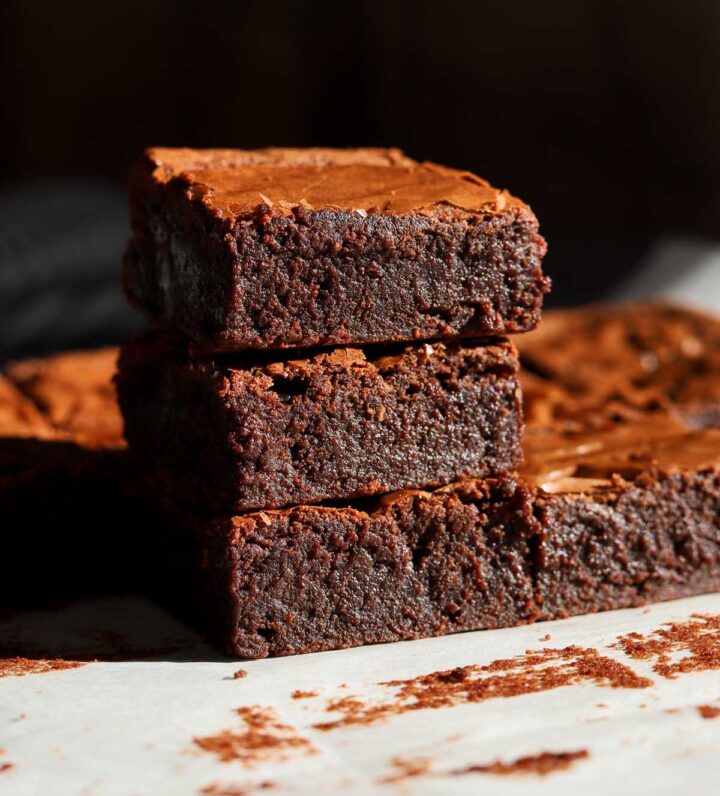
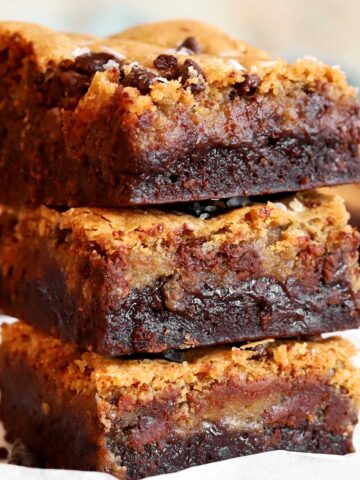
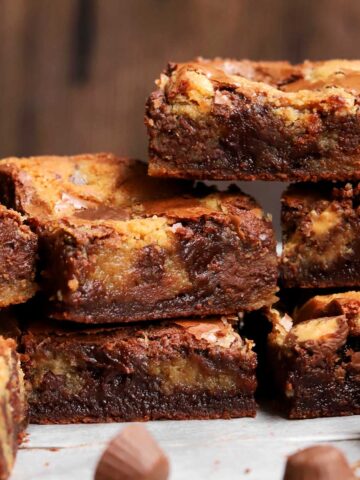
Best Homemade Brownies (Thick & Fudgy)
There's no secret that I LOVE brownies. They are just so approachable with pantry ingredients. My BEST Homemade Brownies recipe makes the ultimate fudgy brownies that are rich, thick, moist and indulgent while also being not too sweet. They are made with pure dark chocolate and a bit of cocoa powder for deep chocolate flavor, and I promise they are better than any brownie you'd buy at a bakery. I cherish this brownie recipe, and what's unique about it is that it has half as much butter as most recipes that you might find in cookbooks or on the internet. You don't need a cup of butter to make delicious fudgy brownies; you just need thoughtful proportions, the right technique and modest baking time. This recipe is straightforward. You can easily make a batch of melt-in-your-mouth brownies from scratch without any special equipment. They are easy enough to make any day of the week, so I hope you ditch the box mix. My Best Fudge Brownie Recipe with Shiny Crust is one of the most popular recipes on this site, and many readers requested a thicker version, so here it is! Thick, fudgy delicious homemade brownies await!

WHY THIS RECIPE WORKS
- Easy to make brownie recipe - this is an easy homemade brownie recipe that can be made entirely by hand without a mixer, and requires few simple ingredients.
- Homemade quality - nothing beats a homemade treat, and you can trust that after you follow this recipe, you will never buy brownies again! They aren't too sweet either.
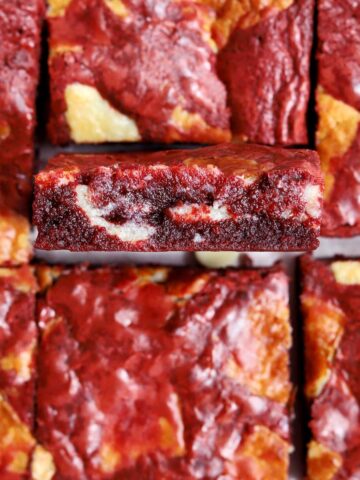
- Thick and fudgy chocolate brownies - these brownies have a nice thickness with a fudgy texture all the way through.
- Shiny crust brownies - as per usual, my brownie recipes always have a shiny crust! You can learn all about the science behind how that works in my Shiny Crust Brownie Recipe post here.
- Rich dark chocolate flavor - you will certainly get your chocolate fix with the intense rich chocolate taste thanks to bittersweet chocolate and not a lot of flour to drown it out. This recipe is made with 7oz of pure bittersweet dark chocolate for rich chocolate taste.
- No too sweet - to make thicker brownies, I didn't just double the recipe of my Shiny Crust Brownies to make more batter because that would double the amount of sugar in the same amount of servings, and I felt that it would make these too sweet. These brownies are formulated to be moist and fudgy without being cloyingly sweet.
- No oil - I don't trust a brownie recipe with oil in the ingredient list. Oil is great for cakes where it can help the batter expand and lets cake stay soft even in cold temperatures. However, brownies are dense and oil would leave them with a greasy mouthfeel if not baked all the way through. I also don't like the taste of oil in a dense batter. Perfectly fudgy brownies should be based on butter and oil is a cheats way of making them look fudgy, but it sacrifices flavor.

CHEWY VS. FUDGY BROWNIES - WHAT'S THE DIFFERENCE?
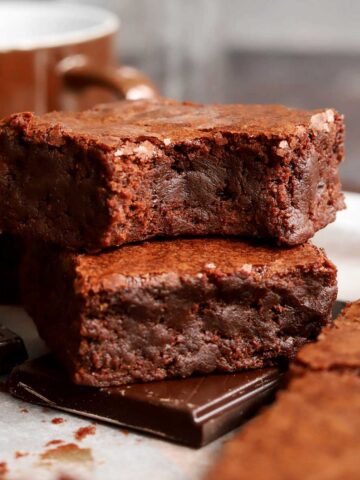
Although this is mainly a fudgy brownie recipes (my favorite kind!), it is unique in that it makes brownies with both textures. The middle pieces are especially fudgy and melt-in-your-mouth while the edge pieces have a slight chewiness. The main difference between chewy and fudgy brownies is the source of fat and chocolate. Fudgy brownies are chocolate-based, meaning that they have a high amount of melted chocolate in the batter. Melted chocolate contains cocoa butter which is a hard fat that melts sharply at body temperature. The brownies will be firm at room temperature, but then will a "short'' texture and will melt in your mouth like fudge as you bite into them.
Chewy brownies have a higher content of butter (and sometimes oil, although I do not prefer making brownies with oil) and use cocoa powder as the source of chocolate flavor. Butter is a softer fat that has a wider temperature range for melting, which gives brownies a chewier texture.

INGREDIENTS FOR BEST HOMEMADE BROWNIES
Here are some notes about the ingredients. For a full list of ingredients, check out the recipe card at the bottom of the page.
- Dark chocolate - anything between 60 and 70% cocoa solids will work. I prefer Bittersweet Chocolate and these bittersweet chocolate callets are very convenient. Semi sweet chocolate will also work, but you can expect sweeter brownies.
- Unsalted butter - the best brownies that have a chewy fudgy texture are made with butter. You can also use salted butter. If you use salted butter, reduce the added salt in the recipe by half.
- Pure vanilla extract - vanilla plays a big role in enhancing the flavor of chocolate. I like this Madagascar Bourbon Vanilla extract.
- All purpose flour - regular all purpose flour is perfect to make fudgy brownies. Use unbleached flour which will give you that nice dense texture.


- Cocoa powder - cocoa will bump up the chocolate taste in the brownies and also replace some of the structural function of flour for a super fudgy texture. You can use natural cocoa or Dutch Process cocoa powder in this recipe. Natural cocoa will have a more fruity taste while Dutch cocoa will have more roasted earthy undertones.
- Eggs - 3 whole eggs will provide majority of the structure in these brownies and they are nice and thick.
- Granulated sugar - simple fine white granulated sugar keeps these brownies moist. I do not recommend reducing the sugar in this recipe or they will not have the same moist and fudgy texture and it will compromise the shiny crust.
- Brown sugar - you can use light or dark brown sugar here. It will add extra depth of flavor from the molasses, and it will also make them extra fudgy.
- Salt - salt is important in any baking dessert recipe, but especially here in these brownies! It totally enhances the chocolate and coffee taste.

STEP BY STEP INSTRUCTIONS: HOW TO MAKE FUDGY BROWNIES
- STEP 1.) Melt chocolate. Combine chocolate and butter in a heatproof bowl over a saucepan of simmering water and stir frequently until melted, or you can do this in the microwave gently with frequent stirring so it doesn't burn.
- STEP 2.) Beat eggs with sugar. Combine eggs with both types of sugar in a large bowl and whisk vigorously by hand until pale, thick and fluffy. You can also use a hand mixer and mix on medium speed for 1-2 minutes. Mix in vanilla and salt.
- STEP 3.) Add chocolate to eggs. Add warm chocolate mixture to the beaten eggs and whisk it in until evenly incorporated. The mixture should tighten up and become thick and glossy.
- STEP 4.) Add dry ingredients. Sift flour and cocoa powder over the chocolate batter to remove any lumps and distribute it evenly. Fold it in until evenly blended.
- STEP 5.) Bake! Spread batter evenly into prepared pan and smooth out the top. Bake for 28-32 minutes until a toothpick inserted into the center comes out with a few moist crumbs attached and the top is shiny crinkly and puffed. It will sink as it cools. Transfer pan to a wire rack and let cool completely in the pan before slicing. For even fudgier brownies, let them set overnight in the fridge before slicing.

HOW TO SLICE BROWNIES CLEANLY
One of the most common questions that readers ask me is "how do you get such neat slices on your brownies?". Here are my steps for cutting brownies so that you end up with clean edges. You can read all the details on this post.
1) Line your baking pan with parchment paper so that you can remove them easily and neatly from the pan. To do this, cut two sheets of parchment the same width as the inner length of your pan, then place them crossways so there is about 2 inches of overhang at the sides of the pan. I also use metal binder clips (they're oven-safe) to clip the paper down to the sides of the pan so it doesn't move around when I spread out the batter.
2) Let the brownies cool completely. It is important to wait until your brownies have completely cooled to room temperature. As brownies cool, the chocolate and the butter will set and solidify so that they won't fall apart, stick or crumble as you slice them.
3) Remove brownies from pan. Use the overhanging parchment to lift the brownies out of the pan and onto a cutting board so that you can slice them right across with a large knife.
4) Use a sharp, straight, thin-bladed knife. To cut brownies cleanly, use a knife with a straight-edge blade. Do not use a serrated knife. My knife of choice is a thin-bladed santoku knife or chef's knife with a long blade that covers most of the length of the brownie so that you don't need to slice up and down too much which will bring up sticky crumbs and cause drag.
5) Use a hot dry knife. Run the blade under very hot water and carefully wipe it dry with a paper towel or cloth between each slice. The heat will help the blade glide through the brownie as it melts the butter and chocolate. It is important to clean the blade between each slice as the residue will cause drag and smudge the brownies and smear the edges.

EXPERT BAKING TIPS FOR BEST HOMEMADE BROWNIES:
- Never use raising agents like baking soda or baking powder. Brownies are meant to be dense and using leavening will create gases that can make the brownie seem dry.
- Always use room temperature eggs so that they incorporate more evenly and the warmer temperature helps sugar dissolve. TIP: to bring eggs to room temperature quickly, submerge them in warm water for 10 minutes.
- Mix the eggs with the sugar first instead of stirring the sugar into the melted chocolate. Sugar cannot dissolve in fat, but it can dissolve in the water within egg whites. That's the key to getting the shiny crust on these brownies.
- Whisk by hand for a thicker crust or mix with an electric hand mixer for a very thin tissue paper crust. The physical agitation of a mixer will further dissolve the sugar and also incorporate air which will make a very thin wrinkly crust if that's what you prefer.
- Melt chocolate gently without burning it. You can melt the chocolate this several ways. Since we're melting it together with butter, I simply do it directly over the stove since the butter will help prevent it from burning (just be sure to stir constantly). Place chocolate and butter in a stainless steel saucepan (this is my go-to pouring saucepan that everyone asks me about!) and place it over very low heat stirring constantly until melted and smooth. You can also use a double boiler and place the chocolate and butter in a heatproof bowl, then set it over a saucepan with just about ½ inch of simmering water. The bowl should fit nicely into the saucepan without touching the water. Alternatively, can also melt it in the microwave at 50% power with frequent stirring to make sure it doesn't burn.
- Keep the chocolate warm. Adding warm melted chocolate to the egg mixture will not scramble the eggs! First of all, it is not hot enough, and second of all, the eggs are already protected by the sugar. Adding warm chocolate will keep the batter warm to encourage more sugar to dissolve for that shiny top.
- Measure dry ingredients accurately. Too much flour will make brownies dry. Brownies rely on a low proportion of dry ingredients in the batter to have a moist texture (along with the right amount of sugar).
- Mix gently. When you add the dry ingredients, just mix or fold them in gently until it is evenly incorporated but avoid mixing vigorously. Too much mixing will create gluten which will create large pockets in the baked brownies and will cause them to have a less tender melt-in-your-mouth texture.
- Bake at a lower temperature. I bake these brownies at 325 degrees F, not 350 degrees F. This ensures the batter bakes evenly for fudgy brownies end to end. Since it is quite a lot of batter for an 8-inch pan, baking at this temperature ensures that the center is cooked when the edges are set. You can also bake at 350 degrees F with good results, but I find that the edge pieces tend to dry out a bit more by the time the middle is set.
- Watch the baking time. One of the main reasons for dry brownies is over-baking. These brownies should take between 25 and 30 minutes when baked in a metal pan. Start checking after 25 minutes. A skewer should not come out clean. It should come out with a few moist sticky bits attached. If it comes out clean it may be over baked, and if it comes out with wet batter then it is still a bit raw.
- Cool completely. For the best texture, it is important that the brownies cool completely.

BROWNIE SCIENCE: HOW TO GET A SHINY TOP ON BROWNIES
It's all about dissolved sugar. The shiny crust that forms on brownies is a sign that they will be fudgy because it means that the sugar is well dissolved, and dissolved sugar makes things moist. That glossy top is a result of very tiny sugar crystals that form in a organized fashion and reflect light which appears shiny to the eye. This crust develops under two main conditions: high concentration of sugar, and thorough dissolution of sugar in an aqueous phase. That's why the first step in the recipe is to whisk sugar into the eggs since egg whites are the main source of moisture in a brownie recipe. When you see a recipe that says to mix sugar into butter and chocolate before adding the eggs, it is less likely (although not impossible depending on the recipe) that the shiny crust will develop.
My best tip is to use room temperature or warm eggs. The warmer temperature not only helps sugar dissolve, but it will encourage stronger bonds between egg proteins and sugar which is what creates the crackly crust. The longer and more vigorously that you whip the eggs with the sugar, the thinner and more wrinkly the crust will be.

RECIPE FAQ
For this recipe I recommend bittersweet chocolate which has 70% cocoa solids, however you can use any dark chocolate between 50% and 70% cocoa solids. Note that if you use semi sweet chocolate, the brownies will be sweeter. Do not use milk chocolate because there is not enough cocoa to create the rich chocolate taste and fudgy texture. Milk chocolate can be up to 70% sugar.
I make these brownies both ways - with unsalted and salted butter. I often like using salted butter for a rich flavor and salty/sweet balance. You can also use unsalted butter in this recipe if you prefer a slightly sweeter taste - both ways are delicious.
I developed these brownies to have flour, but if you avoid wheat or if you are interested in a flourless brownie recipe, check out my fudgy Gluten Free Brownies! They are also VERY good.
I would not recommend reducing the sugar any further as it will make the texture less fudgy and moist. If you prefer a lower sugar brownie recipe, then check out my Fudgy Low Sugar Brownies with Shiny Crust here!
If you want extra thick, tall brownies, you can add another 1-2 tablespoons (9-18g) of all-purpose flour. This will give the batter a bit more structure so the brownies bake up more level and will not deflate much. The caveat is that adding more flour makes the batter more prone to drying out, so be very cautions with the baking time and check for doneness right at the 28 minute mark.
If your brownies turn out dry, then it is most likely because they are over-baked. These low sugar brownies are ready when a skewer inserted into the center comes out with a few moist sticky crumbs attached - not wet batter, and NOT clean. If the skewer is clean then the brownies are over-baked and if the skewer has wet batter then they are still raw.
Brownies keep really well at room temperature as long as they are stored in an airtight container to prevent drying out. If you plan to keep them for more than a couple of days, then store them in the fridge.
The number one reason why these would turn out dry is if they are over-baked. Check on the brownies at 25 minutes. Also, take care to measure the flour accurately.
To get neat clean squares when you slice the brownies, run a sharp knife under hot water and wipe it clean between each slice. See my 5 steps above under "How to slice brownies cleanly" heading for more details.

If you love brownies, check out these recipes!
Triple Chocolate Brownies Fudgy Grain Free Brownies Olive Oil Brownies with Date Fudge Frosting Fudgy Buckeye Brownies Outrageous Fudgy Chocolate Chip Cheesecake Brownies The BEST Small Batch Fudge Brownies Homemade Cosmic Brownies Recipe!More Brownie Love:
Looking for more brownie recipes? Try these:
Chocolate Heaven:
Craving more chocolate? Check out these recipes:
Video
BEST Homemade Brownies

Ingredients
- 7 oz (200g) bittersweet chocolate* (minimum 70% cocoa), coarsely chopped
- ½ cup (113g) salted butter**
- 3 large eggs at room temperature
- ¾ cup (150g) granulated sugar
- ½ cup (110g) packed light brown sugar
- ½ teaspoon salt
- 1 teaspoon (5ml) pure vanilla extract
- ½ cup (71g) all-purpose flour, sifted (see notes in FAQ section about adding more flour)
- 3 tablespoon (18g) cocoa powder (I prefer this one), sifted
*It is important to use bittersweet chocolate for this recipe or the brownies will be too sweet. I often chop up Lindt 70% bars. and I also love these single origin couverture chocolate discs.
**see notes under FAQ on using unsalted butter
NOTE: for best results, use a kitchen scale to weigh the ingredients.
Instructions
- Preheat your oven to 325°F. Line an 8x8-inch metal baking pan with parchment paper, leaving a 2-inch overhang at each side.
- First melt the chocolate and butter together. You can do this several ways. Place chocolate and butter in a stainless steel saucepan (this is my go-to pouring saucepan that everyone asks me about) and place it over very low heat stirring constantly until melted and smooth. You can also use a double boiler and place the chocolate and butter in a heatproof bowl, then set it over a saucepan with just about ½ inch of simmering water. The bowl should fit nicely into the saucepan without touching the water. Alternatively, can also melt it in the microwave at 50% power with frequent stirring to make sure it doesn't burn.
- In a separate bowl, combine eggs with both sugars and whisk vigorously until pale and thick. It will look syrupy and a bit frothy. For a very thin and wrinkly crust, use an electric hand mixer on medium speed for 1-2 minutes until the eggs are very pale yellow and thick. Mix in vanilla and salt. Add the warm chocolate mixture and then mix it in using a wooden spoon or spatula until evenly incorporated. The batter should tighten up and look thick and glossy when it is evenly incorporated. Using a spoon will prevent incorporating too much air at this stage to keep the brownies dense and without air pockets.
- Sift the flour and cocoa powder over the batter and fold it through until it is evenly combined. It is important to sift these ingredients if they are lumpy as you will see pockets of flour if it is not dispersed evenly.
- Scrape the mixture into your prepared pan and spread it out evenly using a small offset spatula. Bake for 28-32 minutes until puffed and shiny on top and a skewer inserted into the center comes out with a few moist, sticky crumbs attached. Do not over-bake. A skewer should not come out clean.
- Transfer pan to a wire rack and let cool completely in the pan. For best results, refrigerate for 1-2 hours before slicing and they will be extra fudgy.
Hi Cristina
I wanted to try these. Can these be made eggless? Please advise
Hi Vini! I would suggest trying my Eggless Brownies recipe also on the site.
These are my go-to for homemade brownies now - they are unreal fudgy and fly off the plate when we make them!
Thank you Sam! 🙂
Hi! I wanted to ask about blooming cocoa powder in hot coffee. Would this be optimal for a brownie recipe like this- especially considering coffee brings out the flavour of the chocolate more, but I wanted to know what impact this would have on the brownies overall, taste-wise and texture-wise
Hi Zaina! I wouldn't recommend that as it will change the ratio of liquid ingredients to dry ingredients and it will change the texture and appearance.