The BEST Sponge Cake (soft & moist!)
If you've ever turned your head up to sponge cake because it's often dry and bland, then I'm about to change your mind. This is my recipe for the BEST Sponge Cake that is unbelievably soft and moist. This is the fluffiest and softest vanilla sponge cake that I have ever had and it's thanks to a unique ingredient and method. There's hot cream in the batter instead of butter or oil. You won't believe the results! If you love sponge cakes, check out my popular Vanilla Swiss Roll Cake and my Double Chocolate Swiss Roll Cake recipe.

WHY THIS RECIPE WORKS
- EASY to make - this sponge cake is very easy to make and you only need 2 bowls.
- Soft sponge cake - you can just see in the video how soft these cakes are. The texture of the crumb is so plush and soft that the cakes are very flexible and won't crack nor break.
- Clean vanilla flavor - you will love the creamy custardy vanilla flavor. It isn't eggy at all.
- Moist sponge cake - yes, that's right. Sponge cake can be moist! You will be surprised at how this cake just melts in your mouth.
- Versatile vanilla cake - you can use this recipe in so many ways by adding a variety of different fillings. You can slice the cakes in half horizontally and fill them with Dark Chocolate Hot Fudge Sauce, jam, my Easy One Pot Pastry Cream, Chocolate Pastry Cream, buttercream, whipped cream or my luscious Chocolate Fudge Frosting.

INGREDIENTS FOR THE BEST SPONGE CAKE
- All purpose flour - simple all-purpose flour works just fine in this recipe. You don't need cake flour to make this sponge cake. AP flour will actually help with its flexibility.
- Potato or Tapioca starch - this is important to create the plush texture. Tapioca starch and potato starch have a lower gelatinization temperature than corn starch so they will set more quickly which means that you can bake this cake in less time so it doesn't dry out. Starch does not contain any protein, so it really make a short-textured and tender cake. See the FAQ section below for substitution recommendations.
- Granulated sugar - simple white sugar will keep this cake tender and moist, as well as add sweetness of course.
- Pure vanilla extract - vanilla is essential to this sponge cake so use a nice natural bourbon vanilla extract.
- Eggs - you'll need 6 whole eggs to make the sponge cake.
- Vinegar - this may seem like a strange ingredient, but it functions the same way as cream of tartar by reducing the pH (increasing the acidity) to increase foamability and help the egg whites whip up more readily for a stable meringue.
- Whipping cream - this is my secret ingredient! Instead of butter or oil, I use hot cream. This adds moisture and fat to tenderize this cake. Warming it helps it incorporate evenly and also helps set the starch more quickly.


STEP BY STEP INSTRUCTIONS: HOW TO MAKE SOFT AND FLUFFY SPONGE CAKE
- STEP 1). Combine dry ingredients. Sift flour and tapioca starch into a medium bowl and whisk to blend evenly.
- STEP 2). Whip the egg whites. Place your room temperature egg whites in the bowl of a stand mixer fitted with the whisk attachment (or in a large bowl if using a hand mixer) and beat on high speed for 1-2 minutes until very frothy and doubled in volume.
- STEP 3). Beat in sugar. Add sugar one tablespoon at a time and beat for 7 minutes until pale, thick, glossy and tripled in volume. The egg whites should reach the "ribbon stage" where it can hold a figure "8" as it falls back onto itself when lifted with the beaters. Mix in salt.
- STEP 4). Beat in yolks. Add egg yolks 2 at a time and beat them in until combined.
- STEP 5). Mix in dry ingredients. Sift the flour and tapioca starch over the egg mixture and beat it in gently on low speed just until combined.
- STEP 6). Add the cream. Pour the hot cream around the sides of the bowl, add the vanilla extract and gently fold it in.
- STEP 7). Bake. Divide the batter evenly between the prepared pans. Bake for 20 minutes until evenly golden and it springs back when pressed gently. It should feel slightly firm when you press the surface. Transfer pan to a wire rack to cool for just a minute, then gently run a knife or offset spatula gently around the sides in an up and down motion and invert the cakes on a wire rack while hot.

STEP BY STEP INSTRUCTIONS (watch the recipe video at the bottom of the page for a full tutorial)

Separate the eggs and place egg whites in a large mixing bowl.

Beat egg whites until very frothy.

Gradually add sugar to egg whites while beating.

beat egg whites with sugar until it forms glossy, slightly firm peaks.

Gradually mix in egg yolks.

Mix to combine egg yolks evenly.

Sift in dry ingredients and gently mix them in or fold them in with a balloon whisk.

Add hot cream to the batter.

Fold in the cream and vanilla.

Pour batter into prepared pans.

EXPERT BAKING TIPS FOR PERFECT SPONGE CAKE
- Do not reduce the sugar This sponge cake gets its soft texture from the correct proportion of sugar and flour. Reducing the sugar will make a drier crumb texture since sugar is hygroscopic and binds water so that it stays tightly in the batter and doesn't evaporate excessively during baking.
- Have your eggs at room temperature. This is very important to ensure they whip up quickly and to their most potential. Warm egg proteins will hold air better than cold ones. To bring eggs to room temperature quickly, place them in a bowl with warm water for 10-15 minutes.
- Add the sugar slowly. If you add the sugar too quickly, it will weigh down the egg whites and make it more difficult for them to hold air. It will still work, but it will take much longer for you to beat them to hold peaks. Gradually adding the sugar allows it to dissolve slowly and evenly, and will also build more fine air bubbles into the foam.
- Beat the egg whites and sugar sufficiently. Whipping the egg whites and sugar to the right stage will ensure your sponge is soft, light and flexible. They should be glossy and stiff when ready. Once you add the egg yolks, they will not whip up as well, so get this part right. The best way to check for readiness is when you lift some of the whipped meringue up with the beaters, they should just gently fold over themselves back in the bowl. It should be able to hold a soft peak without falling off the beater.
- Sift the dry ingredients first. This is very important. Sifting accomplishes two things: it breaks up the flour and starch particles so there are no lumps in the batter, and it helps the dry ingredients incorporate evenly so that you don't end up over-mixing the batter.
- Mix the dry ingredients in lightly. Mixing the batter too vigorously at the end will force a lot of the air bubbles out and the cake may come out flat and rubbery. Be sure to use a light hand to gently fold the flour into the egg mixture.
- Do not over-bake. These cakes are done when they are puffed, tall and smooth at the surface with an evenly golden brown appearance. They should feel firm when you press the tops. Over-baking can lead to dry sponge cakes.
- Do not under-bake. Underbaking is almost more risky in this recipe because there's no way to salvage an underbaked sponge cake. Sponge cakes naturally fall or deflate on cooling since they have a high proportion of eggs that souffle on heating and collapse on cooling. It is normal for this cake to shrink quite a bit as it cools, but if the batter is underbaked, they will sink inwards and the texture will be compromised. I'd actually err on the side of over-baking than underbaking this one.
- Do not open the oven door. Sponge cakes are delicate and the starch/protein networks need to set fully before you can check on them. Opening the oven door lets out a lot of hot air and cools the oven down. This dip in temperature will hinder the baking process and may cause the cake to deflate even before the structure has set.
- Keep an eye on the baking time. Set a timer for the first time stated in the recipe and check for doneness. The cake should spring back when pressed gently with your fingertip. An over-baked cake will dry out and be more likely to break or crack.

WHY DOES SPONGE CAKE SHRINK AFTER BAKING?
Shrinking, falling or collapsing is completely normal for sponge cakes. Sponge cake batter has a very high proportion of eggs compared to all other ingredients. This means there is a lot of egg protein that foams up and has potential to hold a lot of air. When these air bubbles are heated in the oven, they expand. Since there is not enough flour or starch in a sponge cake batter, the structure cannot withstand these very large bubbles, and as the baked cake cools, the extreme temperature difference from the hot oven to the cool ambient temperature causes the air bubbles to collapse.

RECIPE FAQ
The key to making a fluffy sponge cake is to whip the egg whites with the sugar to full potential. The meringue should hold a soft/semi-firm peak when lifted with the beaters. Also, have the eggs at room temperature and use a bit of acid (cream of tartar or vinegar) to help the eggs foam.
Proteins are coiled compounds in nature. Picture them as all tangled up and tight. They need to unravel in order to foam up, and cold eggs will resist this unraveling similar to how we shrug and stiffen up when we're cold. Warm egg proteins will take to whipping more readily and will foam up more easily. If you apply heat to egg proteins, they will even change from a tight coiled up shape (like a spring, or a slinky) to a loose shape. Basically, heat unravels them! This increases the surface area that is exposed to air so that the protein strands can bind to air more easily.
Most of us store eggs in the fridge (at least if you live in North America), so planning ahead is important for baking to ensure your ingredients are all at room temperature. You can pull them from the fridge and leave them at room temperature for 1 hour. But what a pain in the butt that is! Who has time to remember? The good news is that there is a quick way to bring eggs to room temperature quickly! Take your eggs from the fridge and place them in a bowl. Submerge them in very warm (not boiling) water from the tap for 10 minutes. This will be enough to use in any recipe that calls for room temperature eggs (which is most of Scientifically Sweet recipes).
If you don't have tapioca starch, you can substitute with an equal amount of potato starch. Both potato starch and tapioca starch have lower gelatinization temperatures than corn starch so they will set quickly. They also don't set to a gel that is as firm as corn starch, so they give the cake a very plush texture.
The short answer is yes. Corn starch is readily available so I can understand that you may want to make this substitution. The difference is that corn starch makes a more rigid gel than tapioca starch so the texture will be a bit more firm.
Starch does not contain any gluten-forming proteins like wheat flour, so it does not contribute to "toughness" or "chewiness" in cake recipes. Instead, it will create a very short or tender crumb. It works in sponge cake recipes because there is such a high volume of liquid from the eggs and it helps to form a gel within the egg proteins.
Yes, for this recipe, DO sift the dry ingredients. Actually, sift them twice! Since this is a relatively wet batter, it is important that the dry ingredients are incorporated evenly without having to mix too much. Over-mixing will deflate all the air bubbles from the egg foam. Sifting the flour will ensure there are no lumps and the flour particles are evenly dispersed so that the they absorb into the batter quickly.

Sifting ensures that flour doesn't lump into the batter. Instead it will gently fall onto the egg foam. If you were to dump all the dry ingredients over the whipped eggs, then they would just sink to the bottom immediately and most likely leave you with a lumpy batter. I always sift half of the blended dry ingredients over the wet mixture, mix it in, then sift the remaining dry ingredients and fold them in. This creates the most homogeneous batter without having to mix excessively which would otherwise knock a lot of the air out of the batter. Sifting also helps incorporate the baking powder evenly.
Some recipe instructions ask you to bake sponge cakes for roll cakes at a higher temperature, such as 375 or 400 degrees F. I find that in doing this you get over-expansion of air bubbles which collapse quickly. The reason for this is because a sponge cake batter is so delicate and there is very little flour compared to moisture to hold the air bubbles in place. When large air bubbles collapse, it can create a dense sponge. I prefer to bake in a moderate oven at 350 degrees F for more even baking so you will have an even flat height for the whole cake.
If your sponge cracks then it could be that you have over-baked it. This would dry it out which is the main reason for cracking.
I have a secret - I don't spray my pans! I only line them with parchment paper on the bottom and I never grease the sides. Ungreased sides allow the sponge batter to cling and climb up for better height. The key is to run a knife around the sides of the pan will the cake is still warm after baking so it doesn't stick too much. If this idea scares you, you can prepare your pans by first lightly greasing them with butter and then dusting them with flour. The flour provides some grip for the batter to climb. The good thing about this method is that it also creates a smoother appearance on the sides if that is important to you.
Store this cake in an airtight container at room temperature for 2 days. Then, store it in the fridge for up to a week. It will stay soft even while cold!
Video
The BEST Sponge Cake (moist & fluffy!)

Ingredients
- 6 large eggs, separated and at room temperature
- ½ teaspoon white vinegar
- ¾ cup plus 2 tbsp (175g) granulated sugar
- ¼ teaspoon salt
- 1 cup (142g) all-purpose flour
- ¼ cup (30g) potato starch or tapioca starch
- ⅓ cup (80ml) 35% heavy whipping cream, heated to just below simmering
- 1 tsp (5ml) pure vanilla extract
Instructions
- Preheat the oven to 350°F. Lightly grease the sides of two 8-inch round cake pans and dust with flour, then line the bases with rounds of parchment paper. I often don't grease my pans at all because I like how the batter climbs up the sides for a taller rise and then I use a small offset spatula to release them, but if you are concerned about sticking and you like a more polished look, then proceed to grease and flour.
- First separate the eggs. Place the yolks in a small bowl and place the egg whites in the bowl you intend to whip them in - in a large mixing bowl if using an electric hand mixer or the bowl of a stand mixer.
- Sift the dry ingredients. Sift flour and potato or tapioca starch into a medium bowl and whisk to blend evenly.
- Heat the cream. Place the cream in a small saucepan and heat it until it almost simmers. It should be hot but not boiling. Set it aside, but keep warm.
- Whip egg whites. Place your room temperature egg whites in the bowl of a stand mixer fitted with the whisk attachment (or in a large bowl if using a hand mixer), add the vinegar and beat on high speed for 1-2 minutes until very frothy and doubled in volume. Add sugar gradually in about 3 or 4 stages while beating. I add about one-fourth of the sugar at a time and beat for 1-2 minutes after each addition. After the last addition, beat until the meringue is thick and glossy and holds firm peaks. You will need to beat for a total of 7 minutes at least. You will know the meringue is whipped sufficiently when you lift up the beaters and the meringue holds a peak that just curls over slightly. If it is still very soft and curls down immediately, then whip it longer.
- Mix in yolks. Mix in salt. Beat in salt and egg yolks 2 at a time until evenly combined and the mixture is pale yellow and fluffy.
- Add dry ingredients. Place a fine mesh sieve over the bowl and sift half of the flour and tapioca starch again over the egg mixture. Beat it in gently on low speed or, better yet, use a big whisk to gently fold it in until just until combined. Sift the remaining dry ingredients on top and fold it in.
- Add the hot cream. Pour the hot cream around the sides of the bowl, add the vanilla extract and gently fold it in with a wide spatula.
- Divide the batter evenly between the prepared pans and then run a knife around in the batter to pop any very large air bubbles. Bake for 20 minutes until evenly golden and it springs back when pressed gently. It should feel slightly firm when you press the surface. Transfer pan to a wire rack to cool for just a minute, then gently run a knife or offset spatula gently around the sides in an up and down motion and invert the cakes on a wire rack while hot.

i haven’t made this yet but i wanted to know can this be made in an angel food pan which js traditional for jewish sponge cake?
Hi Susan! I haven't tested that but I think it will work.
Hi! Do you think I could add ube extract to the hot cream to make it an ube sponge? If not, where would you recommend adding it instead? Thank you! xx
Hi JP! I haven't tested that so I'm not sure of the outcome.
I don’t know if I am reading the recipe correctly. After whipping egg whites for 7 minutes , I am supposed to beat egg yolks into the egg whites mixture? I always thought that it’s the reverse, you fold whites into beaten egg.
Hi Sil! Yes, the instructions are correct. You whip the egg whites first to get the most volume and in my opinion, it is more efficient than other methods.
This is exactly what I’ve been searching for thank you! Can I bake this recipe with one 8” cake pan and longer bake time?
Hi Kimua! I don't recommend baking in one pan as it may result in collapse or poor volume.
Do you think I could bake these in 7 inch pans and just increase the time a bit?
Hi Lauren! Yes you can.
Looks lovely
Will try this for my birthday !
Thank you Angela! I hope you enjoyed the recipe 🙂
Where is the oven time and temperature for this cake?
Hi Abigail! It is in step 1 and step 9. Preheat the oven to 350°F. Bake for 20 minutes until evenly golden and it springs back when pressed gently.
Can I use hot whole milk instead of cream? I didn’t understand which type of cream is it, cooking cream? Cream frais? I live in Europe 🙂 thanks x
Hi Nash! I recommend following the recipe for best results. Look for pure cream with a milk fat content of around 35%.
Hi, would I’d be possible to change the flavour to chocolate? Would you just add cocoa powder?
Hi Emma! No it requires a different recipe. I am working on it 🙂
Hi… would love trying this recipe but i have 1 confusion. The recipe says whipping cream but in India we have whipping cream and fresh cream. Whipping cream only have a little amount of dairy while fresh cream is mostly dairy. Which one do you recommend. Pls and thank you.
Hi Deborah! I would recommend using the product that is made of actual fresh dairy cream, not a "whipped topping" made of vegetable fats and emulsifiers.
Best sponge I have ever made. Tested as written as well as tested using bain marie method using whole eggs (minus vinegar) Both delicious. The bain marie method had slightly better rise. Will never need to try any other recipe.
Thank you so much Chris! Glad you enjoyed the recipe!
Do you grease only bottom of pans or sides as well
Hi Anna! Since I recommend using parchment on the bottom, you only need to grease and flour the sides of the pan. The flour helps the batter climb the pan for more volume.
Can you use cake flour instead of AP?
Hi June! This recipe has only been tested with AP flour. I would not recommend cake flour.
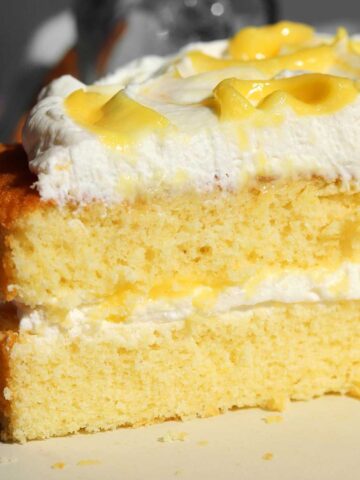
Thank you! And in the picture do you cut the layers into 4 or did you double the recipe?
Hi June! The recipe makes 2 cake layers. I sliced them in half in that photo to get 4 layers.
I’m a great fan of chiffon & sponge cakes and love trying new recipes. Tried this today and made a strawberry cake using this recipe… outstanding!!! It was an instant hit with the family!
Thank you for sharing it.
You are welcome Sunita! Glad everyone enjoyed the cake! 🙂
Can this recipe be adjusted to make a slab cake?
Hi Lori! I haven't tested it by I think it should work. Use a 9x13 and bake for around 25min, but you should check on it.
Followed the recipe to the letter, only difference was putting them in Two 7" tins instead of 8". They were perfect. Great recipe and fantastic instructions. Thank You.
You are welcome Petrina! Glad you enjoyed the recipe 🙂
Hi Christina! How do I store the sponge and for how long? Is it freezable?
Hi Mary! Store this cake in an airtight container at room temperature for 2 days. If you want to freeze it, make sure to wrap the layers well and place in an airtight container or bag.
Hi Chistina, do you think adding lemon zest into the sugar and rub it in, add some poppy seed into the batter at the end would make a great lemon poppy seed sponge cake?
Hi Iris! Yes, I think that could work.
This was an amazing recipe. Could it be made into cupcakes?
Thank you Cathy! I wouldn't recommend as cupcakes as the cakes deflate on cooling and will be too short.
La harina de tapioca se puede sustituir y por cuál