How to Temper Chocolate at Home
There are a few things you must have and must know in order to temper chocolate and in this article I will explain all the different ways that you can temper chocolate at home. Tempering chocolate sounds very technical, and it is... However, did you know you can actually temper chocolate without tempering at all? I'll explain 3 different methods and the first one is the easiest and quickest way as long as you start with nicely tempered fresh chocolate in the first place. Learning how to temper chocolate at home allows you to make picture perfect chocolate covered confections with shiny gloss and hard shell that cracks and snaps beautifully under your teeth. You can use this technique to coat my Easy 2-Ingredient Chocolate Truffles or my Mocha Peppermint Chocolate Truffles.

WHAT IS TEMPERING CHOCOLATE?
Tempering refers to a series of heating and cooling stages at precise temperatures which coaxes the cocoa butter fat crystals in chocolate to melt and then recrystallize in a stable and organized manner to give chocolate a nice shine, crisp snap and smooth melting. There is an easy way and a more complicated way to do it... I explain each way below in the post. You choose which way works best for you (but, I'll suggest the easy way!). Keep in mind that the temperatures are different for different types of chocolate - in general dark is 120°F, milk is 115°F and white is 110°F.

WHAT IS COCOA BUTTER?
Cocoa butter is the fat found in cocoa beans and comprises from 25-40% of dark chocolate. Cocoa butter fat crystals can set into 6 different forms that all have different melting properties. Form V (five) is the most stable and organized crystal structure that gives chocolate its most desired qualities. Once chocolate is melted it loses its organized structure and must be cooled in a controlled way in order to ensure that it sets back up nicely.

TOOLS FOR TEMPERING CHOCOLATE
There are a few things you must have and must know in order to make shiny, snappy tempered chocolates at home:
- Chocolate molds - I use silicone ones. They are easy to find and use. Go to a kitchen supply shop and pick out the shape you like.
- Thermometer - tempering chocolate means taking temperatures.
- Saucepan or saucepot for simmering water.
- Heat resistant metal bowl to make a double boiler.
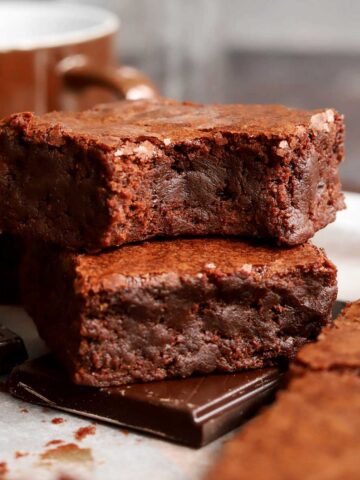
- High quality dark chocolate - if you are going to take the time to do this, don't waste it on shabby chocolate. Get the good stuff. Couverture chocolate is best for confectionery because it has a high cocoa butter content, and thus high fluidity for coating and moulding, but regular (good quality) chocolate is perfectly fine. I prefer this dark chocolate.
- Patience.

WHAT IS A DOUBLE BOILER?
A double boiler is an indirect method of heating by steam which is a gentle form of heating. It prevents chocolate from scorching or over-heating. It involves a heatproof bowl set over a saucepan filled with a low amount of gently simmering water. Here are some tips to ensure success:
1). Ensure that the bowl on top doesn't touch the simmering water below.
2). Use a heavy bottomed saucepan for the bottom and a metal or heat-resistant glass bowl for the top.
3). I recommend metal as it is lighter and easier to work with.
4). Wipe the bottom of the bowl with a kitchen towel to dry off the condensation from the steam as the water may drip down as you are transferring the bowl. If water contacts any of your already-made truffles, it will ruin the temper.
WHAT CHOCOLATE IS BEST FOR TEMPERING?
You'll have the most success if you choose high quality chocolate with a high cocoa butter content for tempering. Chocolate with a high cocoa butter content is called "couverture" chocolate as it has high fluidity once melted. My preferred chocolate for baking and confections are these single origin couverture chocolate discs or and these semisweet chocolate chips. You will also have success with my favorite 70% bars.
STEP BY STEP INSTRUCTIONS: HOW TO TEMPER CHOCOLATE
The temperatures to which you heat and cool your chocolate depends on the cocoa content. If you are using dark chocolate with a cocoa content between 60 and 70%, then follow these guidelines. The EASY way to temper chocolate is Method 1.

METHOD 1: INCOMPLETE MELTING (THE EASY METHOD)
- Chop up all of your chocolate. It is important to chop it very finely. The smaller the pieces, the faster and more evenly it will melt. If your chocolate is already glossy and shiny and well-tempered, then you can skip a bunch of steps. WOO! But, and I mean BUT, for this to be successful you must have very small pieces and be very precise.
- Make a double boiler. Grab a saucepan and a mixing bowl. The saucepan should be just large enough to hold the mixing bowl so that it rests over top without touching the bottom. In other words, the bowl should just rest on top of the pan. Add about ½ inch of water to the saucepan and bring it to a gentle simmer.
- Melt the chocolate. Place chocolate in the bowl and stir constantly. The bottom of the bowl should not touch the water beneath it. This is called indirect heat. The goal is to just barely melt the chocolate so that it is fluid but not a single degree over 90°F. If it goes to 92°F, then you risk melting and disassembling the organized cocoa butter crystal structure that your chocolate manufacturer has worked hard to build.
The idea is that you are going to melt the chocolate, but not enough to melt the desirable crystals that keep it in temper. You need to stir constantly for even melting over very low heat and monitor the temperature very carefully. This is the easy way to temper chocolate and by far the least complicated.

METHOD 2: THE SHORTCUT
- Make a double boiler as indicated in Method 1 above.
- Heat to melt all cocoa butter crystal forms. Melt all of the chopped chocolate to 120°F. At this temperature, ALL of the crystals melt.
- Cool down. Remove from heat and cool down by stirring constantly until it reaches 100°F.
- Seeding. Once it reaches 100°F, start adding more very finely chopped or grated (even better!) tempered chocolate until it cools to 90°F. The already tempered chocolate that you are adding acts as template to encourage the melted chocolate to set in the same shape. This is called "seeding". At 90°F, the chocolate is ready to use for dipping, dunking, molding or coating.

METHOD 3: PROFESSIONAL
This method is the most tedious and is absolutely required if you are already working with bloomed (ie. not shiny/glossy) chocolate.
- Make a double boiler as indicated in Method 1 above.
- Heat to melt all cocoa butter crystal forms. Melt all of the chopped chocolate to 120°F. At this temperature, ALL of the crystals melt.
- Cool down. Remove it from the heat and cool it down by stirring constantly until it reaches 82°F (78-80°F for white and milk chocolate). This can take a very long time depending on the temperature of your kitchen (assuming you are doing this in the kitchen). To help it along, add a fresh chunk of already tempered chocolate to the pool when it reaches 100°F. This will cool down the mixture quickly while providing nuclei too. If you have a cool room or a cantina, step in there while stirring the chocolate to accelerate the cooling. At 82°F we can be sure that certain crystals will have formed (namely crystal forms IV and V). Form V is the most favorable so now we want rewarm the chocolate to melt any form IV's and keep V.
- Warm it up. Place the bowl over the heat again and bring it to 90°F while stirring constantly. Do not let it go over 90°F! It is now ready to use. You can continue to use this chocolate and reheat it to 90°F as you are molding.
At this magic temperature of 90°F, you should have a pool of form V crystals that will set to a firm snap and glossy shine.

EXPERT TIPS FOR TEMPERING CHOCOLATE
- Choose a cool dry day - hot and humidity will make for a mess and stress. Chocolate behaves best between 60 and 68 degrees F, which is 16 and 20 degrees C.
- Give yourself space - chocolate-making can sometimes be messy work so clear a space in your kitchen to allow room for transferring and cooling, etc.
- Use clean utensils - if you have any particles, such as lint or sugar, on your utensils, it can disrupt the crystallization of the cocoa butter particles. Also, be sure your area is dry and free of moisture.
- Finely chop the chocolate - whether you use method 1 or method 3, chop the chocolate very finely. It helps for the chocolate to melt evenly and quickly.
- Use high quality chocolate with a high cocoa butter content. This is called couverture chocolate. My recommendations are for these semisweet chocolate chips. and these bittersweet chocolate discs.
HOW TO MAKE CHOCOLATE TRUFFLES
- STEP 1). Place a wire rack over a large baking tray that's lined with parchment or waxed paper (for easy clean-up).
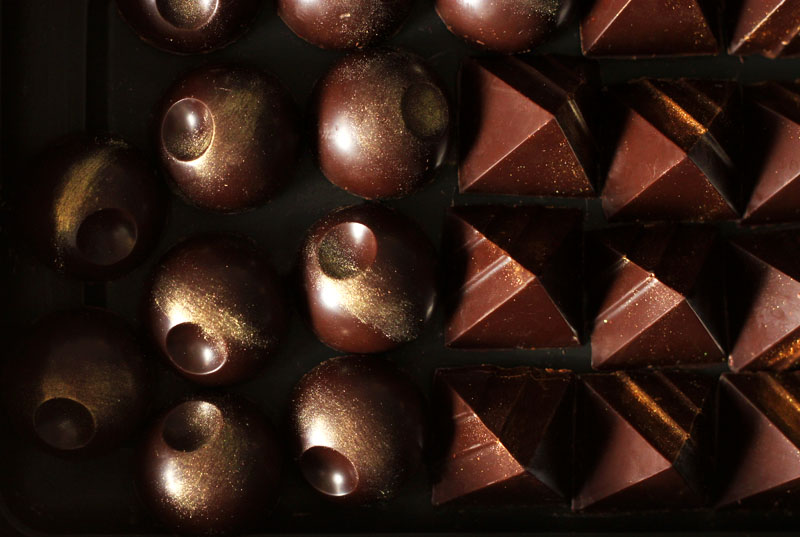
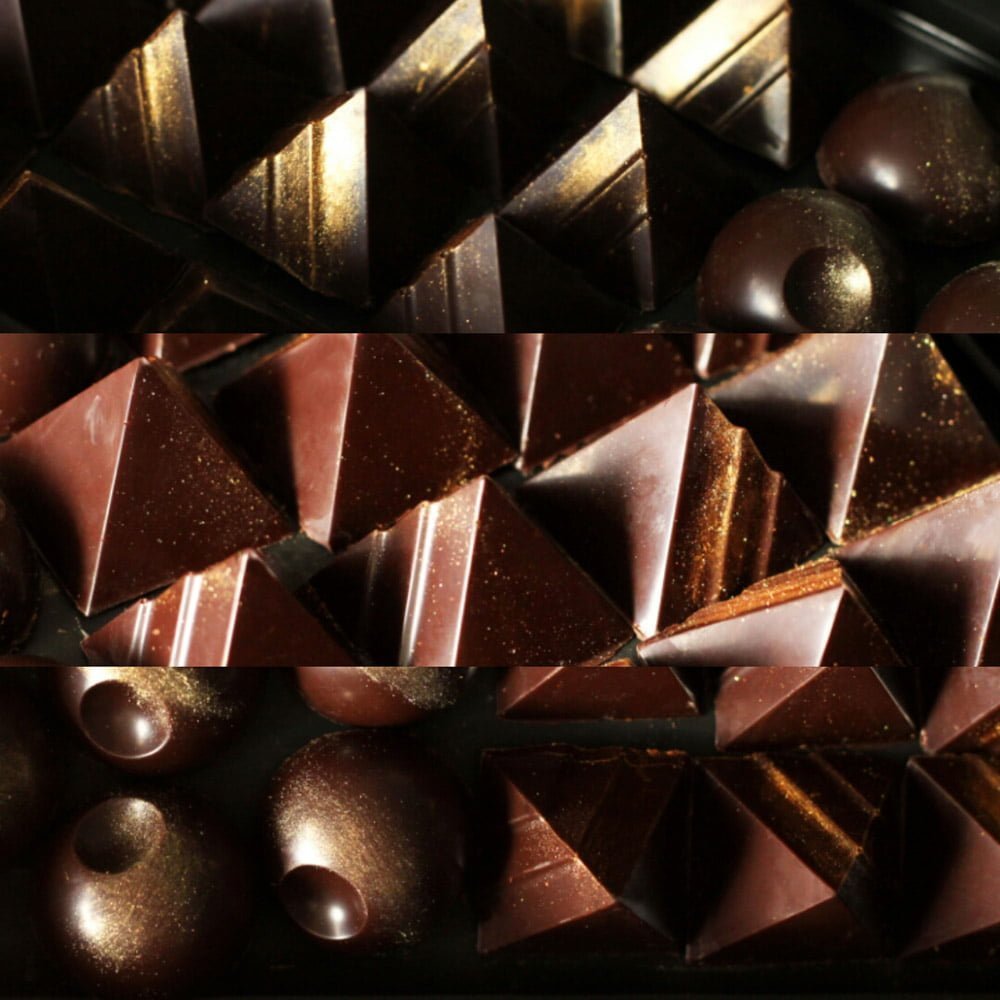
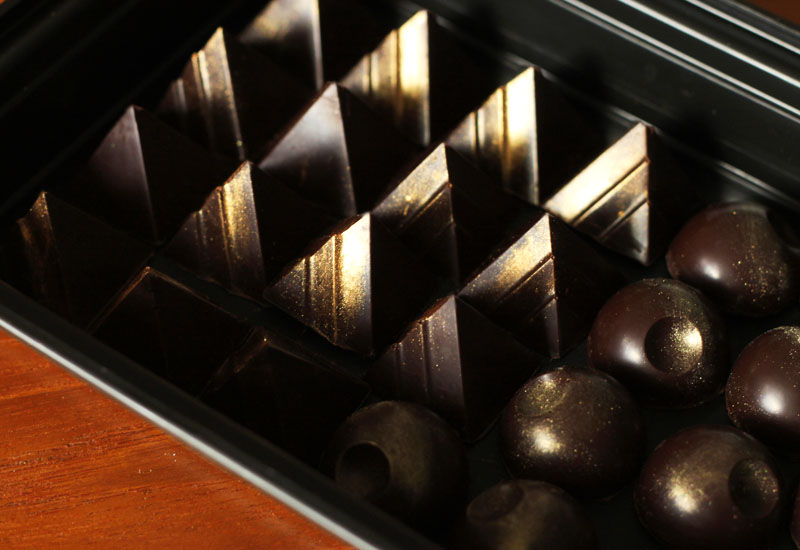
- STEP 2). To create your tempered shells, pour a generous amount of tempered chocolate over the mold, filling in all of the shapes. Now, turn it over and hold it over your bowl of tempered chocolate and let the excess drip back down into the pool. Place the mold (upside down) onto the rack and let it rest for 1 or 2 minutes to let excess chocolate continue to drip. This will leave you with even, thin shells.
- STEP 3). Turn the mold right-side-up and sweep an off-set spatula flush with the surface to scrape away any chocolate that collects on the flat surface around the indentations. Now place it on a tray and refrigerate until hard and set. This normally takes just 10-15 minutes if your chocolate is tempered properly.
- STEP 4). Once set, remove the mold from the fridge and fill each cavity with whatever you desire (i.e. chocolate ganache or caramel). Let set again and then cover with more tempered chocolate. [At this point you may need to carefully re-heat the chocolate to 90°F so that it is fluid and workable. I normally keep the bowl resting over a saucepan of very warm/barely hot water (off the heat). Make sure the water is not hotter than 90°F.] Again, sweep an off-set spatula or palette knife flush with the surface to scrape away any chocolate that collects on the flat surface around the indentations. Refrigerate to set and then pop the chocolates out of the molds. Brush with edible gold dust for an extra special touch.
To make spheres, you need to "glue" two domes together. Place a dry frying pan over very low heat. If using gas, just warm up the pan and then remove it from the heat. Take two chocolates and place them flat-side-down on the warm pan to melt the flat sides just slightly and then press them together. Let them set and you're sailing.
RECIPE FAQ
The only way to temper chocolate int he microwave is to use Method 1 with frequent stirring and on a low power setting. I recommend placing the finely chopped chocolate in a heatproof bowl and heat for 30 seconds at a time on 50% power setting. Stop every 30 seconds and stir thoroughly. Stop heating it once 75% of the chocolate is melted and then continue stirring to allow the residual heat melt the reset of the chocolate. This will ensure that you don't overheat the chocolate.
Chocolate bloom refers to the white film that appears on chocolate when it is stored improperly, poorly tempered or exposed to temperature fluctuations. There is fat bloom and sugar bloom. Fat bloom feels oily or waxy while sugar bloom may feel slightly grainy and look powdery.
First we should understand that cocoa butter is made up of fat crystals that can set into 6 different shapes or forms. Form "V" crystals are the most desirable as they set up glossy and shiny with a firm snap - it's what makes chocolate look so appealing and melt so smoothly. Fat bloom happens for a couple of reasons: 1) improper tempering of melted chocolate; 2) improper storage of tempered solid chocolate, or 3) long storage or aging of solid chocolate.
1). Fat bloom appears from melted chocolate that is improperly tempered so that the less stable and less favorable cocoa butter crystals form instead of the most favorable and more stable crystalline form "V".
2). Fat bloom also happens when tempered solid chocolate is not stored properly as it should in a cool dry environment. If chocolate is exposed to extreme temperature fluctuations, the stable crystals can melt and separate from the cocoa solids. This melted fat can migrate to the surface and re-crystallize once cooled again, however it will set uncontrollably into the less desirable and less organized structures that reflect light and appear white.
3). It can also happen over time if solid chocolate is stored for too long. Over time, the desirable beta form "V" cocoa butter crystals morph into the most stable form "VI" which is harder in texture and has a higher melting point so it melts too slowly.
Sugar bloom happens when chocolate is exposed to high humidity or condensation. The sugars in the chocolate absorb the excess moisture from the environment which draws the sugar to the surface of the chocolate. Once the moisture evaporates, the sugars re-crystallize and form a grainy, powdery layer on the outside the chocolate.
If your chocolate blooms, it is completely edible and safe, but it will lose a lot of its desirable characteristics such as shiny appearance and firm snap. Bloomed chocolate is often dull, streaky and can have either a soft texture or be brittle and slow to melt.
Store completely cooled and set chocolate truffles between pieces of wax paper or parchment paper in an airtight container in a cool dry place. If you live in a hot and humid environment, store it in the fridge and only remove truffles you choose to eat or serve (do not bring the container in and out of the fridge for long periods of time).

Video
How to Temper Chocolate

Ingredients
- 12 oz 340g recently purchased tempered dark chocolate (preferable couverture)
Instructions
- First chop up all of your chocolate very VERY finely. The smaller the pieces, the faster and more evenly it will melt. I like to use a serrated knife to do this job. The chocolate you buy should be glossy and shiny and already well tempered.
- Place the chocolate in a heatproof bowl and set the bowl over a saucepan with just ½ inch of barely simmering water. Stir the chocolate constantly until it three-quarters of the chocolate is melted, but the rest is still in pieces. Make sure to stir all around the sides of the bowl to ensure that all of the chocolate melts evenly.
- Use a thermometer to make sure the melted chocolate does not get heated above 90°F. If it goes to 92°F, then you risk melting and disassembling the organized cocoa butter crystal structure that your chocolate manufacturer has worked hard to build.
- Once three-quarters of the chocolate is melted, remove the bowl from over the heat and continue stirring to let the residual heat melt the rest of the chocolate. Use it immediately to coat or drizzle.
This may sound like a dumb question, but why would you want to temper chocolate that's already tempered??
Hi Judy - it's not a dumb question at all. Once you melt chocolate you risk losing it's temper as long as you don't heat it above the temperature where the tempered fat crystals melt. In many cases this is hard to control at home without a thermometer and it's very easy to over-heat chocolate. In order to keep it in temper, simply don't heat it above the tempering point as described in Method 1.
This article is so helpful! I successfully tempered chocolate for the first time after many failed attempts. Thanks for sharing these tips with us.
Tried this to dip my truffles in and it was so easy! Thanks for all of your knowledge.
If I use Callebaut Callets - which method do I use? Is that tempered? (to followt the instructions of adding temptered chocolate to help the mixture cool down?)
BonBons, not Truffles. I was shocked after you so carefully explained tempering, then seemed about to launch into teaching us to descend into making mere truffles. Google is your friend.
Chocolate-covered truffles to be clear 😉
This is so awesome! Thanks so much for always sharing your knowledge (and recipes) with us! Question: would you eventually post a video of this process??
Ohhhh maybe one day if I have time!
Thank you making these methods available to us! I can't seem to find the source of the link to your preferred chocolate. Are you able to share that in a reply? I will conquer this nemeses of mine, this tempering!!
Hi Carolyn! I have fixed the links now. Please check again 🙂
I’ve always wanted to learn how to temper chocolate! The easy method worked so well! Thanks so much for always sharing your expert advice.
You are welcome Anna! I'm glad you can now apply this new skill!
I've always wanted to learn how to temper chocolate! The easy method worked so well! Thanks so much for always sharing your expert advice.
Hello! How exactly do i find the recipe for that lovely one bowl chocolate cake and frosting?
Hi Deborah! The recipe is here on this site. You can just search for chocolate cake and it will come up 🙂