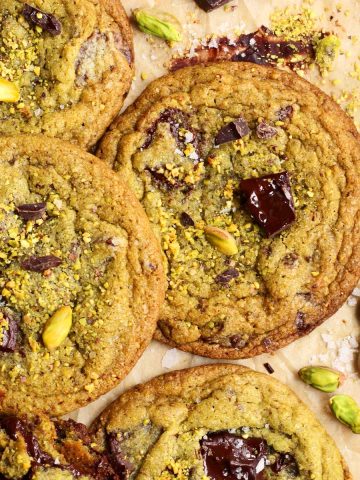
Caramelized Ripple Chocolate Chip Cookies
These Ripple Chocolate Chip Cookies are so flavorful with rich buttery caramel flavors, super crisp and crunchy edges, slightly soft and chewy in the middle and beautifully rippled all around. They are thin chocolate chip cookies that are unlike any other recipe on my site with their unique method for baking on an unlined baking sheet and the high butter to flour ratio. If you've heard of pan-banging cookies, these have the same effect without the need to bang your pan half way through baking. "Pan-banging" cookies are known for their large, round, flat shape and crisp, wrinkly edges - it kind of reminds me of a mud pie. These cookies are large and thin with so much great texture. Everyone who makes these absolutely loves them.

WHY THIS RECIPE WORKS
- No pan banging - some recipes ask you to reach into the oven, lift the pan off the rack and let it go so that the force of the pan hitting down will cause the semi-cooked cookie dough in the center to deflate and ripple out. That's not necessary with this recipe so you can set your timer and walk away.
- Rich butterscotch flavor - the high butter to flour ratio means that these cookies taste so buttery with the perfect amount of sweet and salty balance.
- Crunchy caramelized edges - those caramelized edges are shatteringly crisp like candy. They taste like toffee and makes these cookies highly addictive!
- Soft centers - while the edges are crunchy, the middles are soft and chewy.
- Rippled edges - as the cookies bake, the butter melts and they spread out while simultaneously cooking and setting so they get this wrinkled effect.

HOW TO MAKE RIPPLES IN CHOCOLATE CHIP COOKIES
You don't need to bang on a pan to get this particular look of chocolate chip cookies. My recipe below might look very similar to your typical chocolate chip cookie recipe. It uses the same ingredients you'd expect (butter, brown sugar, granulated sugar, egg, vanilla, flour, baking soda and salt) because the trick to achieving those rippled caramelized edges is actually in the proportions of ingredients in the recipe. You can make these famous cookies with 9 simple ingredients that you likely have in your pantry.

INGREDIENTS FOR RIPPLE CHOCOLATE CHIP COOKIES
- Butter - there is no substitute for butter in chocolate chip cookies in my opinion! It is the foundation of the rich butterscotch flavor after all. In this recipe, you can use salted or unsalted butter, but if you choose salted then I recommend reducing the added salt to ¼ teaspoon.
- Granulated sugar - this recipe uses equal parts white granulated sugar and brown sugar. White sugar helps create the crunchy caramelized edges. I wouldn't recommend reducing the sugar because it will compromise the chewy texture.
- Brown sugar - I highly recommend dark brown sugar for this recipe as it has twice as much molasses as light brown sugar and will make a big difference to the flavor. It will also make the dough more acidic which means it will react more thoroughly with the baking soda so that you won't be left with a soapy taste (a defect I find common in many chocolate chip cookie recipes).
- Egg - you'll need one whole egg for this recipe. It's the perfect amount of moisture to make these cookies chewy and help them spread.
- Pure vanilla extract - good vanilla is absolutely essential to making delicious chocolate chip cookies. I like this Madagascar Bourbon Vanilla extract.
- Salt - don't leave out the salt! It really elevates the rich buttery, caramel flavors! It also enhances the chocolate taste and balances the sweetness. I also love to top these cookies with flaky sea salt after they're baked and while the chocolate is still warm.
- All purpose flour - regular unbleached all-purpose flour makes the best chewy chocolate chip cookies. The ratio of flour to butter and egg is lower than most chocolate chip cookie recipes and that is what makes these cookies spread and ripple. Compare it to my Classic Soft & Chewy Chocolate Chip Cookies or my Bakery-Style Chocolate Chip Cookies and you can see the differences.
- Dark chocolate chunks - this is important! I highly recommend chopping chocolate from a bar instead of using chips. Why? That's because chocolate that is made into bars, also known as "tablets", has a higher cocoa butter content so that it can be poured into molds at the factory and it typically melts smoother than chocolate chips to give you puddles of chocolate in the cookies. I love this effect! Chocolate chips will hold their shape and spread less.


STEP BY STEP INSTRUCTIONS: HOW TO MAKE RIPPLE CHOCOLATE CHIP COOKIES
- STEP 1). Cream butter and sugar. In the bowl of a stand mixer fitted with the paddle/flat beater attachment, cream butter on medium speed until creamy. Add both sugars and vanilla and mix for 3 minutes on medium speed until pale and fluffy.
- STEP 2). Mix in egg. Scrape down the sides of the bowl and beat in egg until evenly incorporated. The mixture should look a bit whipped at this point.
- STEP 3). Combine dry ingredients. In a separate bowl, whisk together flour, salt and baking soda to blend evenly. Add this to butter mixture all at once and mix on low until just combined.
- STEP 4). Mix in chocolate. Add the chopped chocolate and mix on low for a just a few seconds to distribute them.
- STEP 5). Chill. Cover the dough in the bowl with plastic wrap and refrigerate for 30 minutes to 1 hour.
- STEP 6). Prepare baking sheets. Lightly grease two large baking trays with soft butter (I like to use a spent foil wrapper from a stick to do this - no waste!).
- STEP 7). Bake. Scoop 1.5 oz portions of dough onto prepared baking trays leaving at least 3 inches of space between them. Do not flatten - they will spread well enough on their own. Bake for about 12 minutes, or until nicely browned around the edges - like the color of a copper penny. The center should be lightly golden and just started to puff up - that's how you know it won't be completely raw in the middle. Remove trays from oven and transfer to wire racks. Let cookies cool 2 minutes on trays before transferring individually to the racks to finish cooling.


WHAT CAUSES RIPPLES IN CHOCOLATE CHIP COOKIES?
The ripples form because the cookies spread, and they spread almost instantly over the whole length of the baking time. This continuous spreading is what causes the ripples. As the first bit of dough melts, it spreads from the bottom of the dough ball. It looks like a ball of cookie dough sitting in a puddle of batter. This "puddle" now has a high surface area because it is spread out flat so it begins to cook quickly. As it sets, the rest of the cookie dough in the middle is still raw and continues to melt and push the cooked dough out. Alas, ripples start to form.

PAN BANGING COOKIE SCIENCE
- Butter ratio: What makes this cookie dough spread so quick is the higher ratio of butter. That doesn't mean that this recipe calls for more butter per batch compared to other recipes, it just means that there is more butter in comparison to flour by weight. In other words, the butter:flour ratio in this recipe is higher compared to my Classic Soft & Chewy Chocolate Chip Cookies or my Bakery-Style Chocolate Chip Cookies.
- Sugar ratio: The total amount of sugar is about the same as my go-to Chewy cookie recipe but slightly more than Sarah's pan-banging cookie recipe to produce ultra crisp edges and also keep them so chewy in the middle and keep them from drying out. These cookies are great days after baking and don't need to be eaten all in the same day for best results (although you might want to anyway!). The difference is in the proportions of brown to white. Generally I use more brown sugar, but in this recipe I use equal parts. White sugar will create those crisp edges and caramelization reactions will happen much faster without molasses in the way.
- Bicarbonate: ½ teaspoon of baking soda for just 1 cup of flour is generally a lot in most baking situations, but here it performs two important functions: 1) promotes spread - baking soda spreads while baking powder puffs, and 2) promotes browning by way of accelerated Maillard browning reactions that produce delicious nutty, roasted, caramel, coffee flavors. Maillard browning is a reaction that happens between specific proteins and sucrose (sugar). In our cookie dough protein comes from egg, flour and trace amounts in butter.
- Chill time: Refrigerate the dough for at least 30 minutes or up to an hour to help the flour hydrate and the baking soda to distribute itself. No need to chill this dough for multiple hours or overnight because we actually want to encourage some spread here, and there will be so much caramelization that the flavor benefit of prolonged chilling will be less evident. That means these cookies get from mixing bowl to mouth sooner!


EXPERT BAKING TIPS
- Do not use parchment paper - I rarely bake without parchment paper, but for those crisp edges and for rapid spreading, metal contact is key! Bake the cookie dough directly on a greased, nonstick baking pan. Heat transfers instantly from the metal to the dough so that you get instant spread.
- Bake at a high temperature - we want big flat cookies, but we're not making tuiles. Totally slimmed-out cookies can merge into each other, grease out and result in all sorts of odd shapes. They might taste great but they're not "take them to work" worthy, ya know? Bake the cookies at 375 degrees F (that's in a conventional oven, if you're using fan then try 350 degrees F). This will make sure that your cookies spread initially, but also set quickly around the edges to eventually stop the spread and bake to golden caramelized perfection. Leave plenty of room between dough portions - I do 6 per tray.
- Use any type of chocolate. You can make these delicious thin chocolate chip cookies with milk or dark chocolate. Just avoid using chocolate chips which are designed to be bake-stable and withstand melting. Good quality eating chocolate from a block and then chopped up (I love a Lindt 70% bar!) or flat discs or feves are the best choice. They melt gently into the dough and taste superior! Bonus: some of the chocolate around the edges of the cookies bake right into the caramelized dough and it makes a sort of chocolate toffee! Unreal.


RECIPE FAQ
Chilling this cookie dough is so important for the best results. You can bake them right away, but they will not be as golden or as chewy and flavorful as they could be if you chill the dough. Chilled cookie dough also makes cookies with a longer shelf life so they will stay chewy for longer and be slower to stale.
If your didn't spread, then it could be that you used too much flour, not enough baking soda or your oven temperature was too hot. The best way to measure the flour is using a scale to ensure you use the right amount.
If you prefer thicker cookies, you can add ⅓ cup (50g) more flour and you will have classic soft and chewy cookies.
For the best results, use dark chocolate with over 60% cocoa solids, and use a high quality block of chocolate that you chop into chunks (I often use Lindt 70% bars), or go for these single origin couverture chocolate discs.
To get melted puddles with irregular shapes like in these photos, use chopped chocolate from a bar with over 70% cocoa solids. The darker the better when it comes to meltiness because the higher the total cocoa content, the more cocoa butter it will have and that high fat content is what makes chocolate melt and spread easier. Also, block chocolate is tempered as a block that you will break up and expose all sorts of jagged edges whereas chips are tempered in a specific shape that will stay in place.

STORAGE AND FREEZING
These cookies are best stored at room temperature in an airtight container for up to 3 days.
Just place the cooled cookies in a resealable freezer bag and freeze for up to 3 months. They just need 5-10 minutes to thaw.
You can freeze the cookie dough two ways:
1) Wrap all of the dough (or any leftover dough) in plastic wrap, then place it in a freezer bag and freeze for up to 3 months. When ready to bake, thaw the dough and bake as directed.
2) Scoop and portion the dough into balls, then place them on a parchment-lined baking sheet and freeze individually. Once frozen, place them in a freezer bag and keep frozen for up to 3 months.
With nothing more than a tall glass of cold milk!
If you love cookies, check out these recipes!
Salted Pistachio Chocolate Chip Cookies Chewy Pumpkin Chocolate Chip Cookies The BEST Chewy Pumpkin Cookies Chewy Brown Butter Snickerdoodles Cookies Brown Butter M&M Cookies Recipe Lemon Blueberry Cookies with White Chocolate Chunks Coffee Pecan Chocolate Chip Cookies Double Peanut Butter Chocolate Chunk Cookies Hazelnut Double Chocolate Chunk Cookies THE BEST Chewy Chocolate Chip Cookies – Bakery Style!Craving more cookies?
If you love cookies as much as I do, check out the latest recipes:


Baking with chocolate
Here are some of my latest chocolate recipes:
Video
Caramelized Ripple Chocolate Chip Cookies

Ingredients
- ½ cup (113g) unsalted butter, softened
- ½ cup (100g) granulated sugar
- ½ cup (110g) packed dark brown sugar
- 1 teaspoon (5ml) pure vanilla extract
- 1 large egg at room temperature
- 1 cup plus 1 tbsp (150g) all-purpose flour
- ½ teaspoon salt
- ½ teaspoon baking soda
- 1 ¼ cups (6oz/170g) dark chocolate wafers (I love these bittersweet ones), or chop up a dark chocolate block
For best results, use a kitchen scale to weigh the ingredients.
Instructions
- Combine softened butter with both sugars and vanilla extract in a large bowl or the bowl of a stand mixer. Mix by hand using the "creaming method" with a wide rubber spatula to smear the butter and sugar together and mix vigorously until smooth and slightly fluffed. If you use a stand mixer, secure the paddle attachment and mix on medium-low speed for 2-3 minutes. It should lighten in color and look quite fluffy. You can also use a handheld mixer. Scrape down the sides of the bowl and mix in egg until evenly incorporated. The mixture should look a bit whipped at this point.
- Combine flour, baking soda and salt in a medium bowl and whisk to blend evenly. Add this to butter mixture all at once and mix gently until just combined. Add the chocolate and fold it in until evenly distributed.
- Cover the dough in the bowl with plastic wrap and refrigerate for 1 hour.
- Preheat your oven to 375°F. Lightly grease two large cookie sheets with soft butter (I like to use a spent wrapper from a stick or brick of butter to do this - no waste!).
- Use a 1.35-oz cookie scoop to portion dough onto prepared baking trays leaving about 4 inches of space between them since they will spread a lot. You should only have 6 cookies per tray. Do not flatten. Bake for about 10-12 minutes until nicely browned around the edges like the color of copper. The center should be just lightly golden and just started to puff up - that's how you know it won't be completely raw in the middle even though it looks underdone. The center will set as the cookies cool.
- Remove trays from oven and transfer to wire racks. Let cookies cool for 2 minutes on trays before transferring individually to the racks to finish cooling.
Also, I forgot to ask about using gluten free all purpose flour, would I change anything?
Hi Mark! This recipe has only been tested with AP flour, but many readers have reported success with King Arthurs and Bobs Read Mill gluten free flour.
I will be trying this but have a question first. Is it best to put the baking tray in the oven during preheat so it will be hot when putting the dough on the tray? I'm worried if it will spread enough if put on a room temp tray for the first batch?
I made it with room temp pan and it ripples up with edges melting first then slowly the middle. But watch the bake time. 12 min was borderline burned for my first batch…9-10 min was better.
Hi Mark! No, that is not required. just follow the recipe instructions for best results.
I followed recipe exactly (even using a scale) and would recommend to watch and potentially take the cookies out at 9-10 min to prevent burning. Otherwise turned out great, sprinkled some flaky salt immediately after taking out of oven.
Thanks Nancy! Glad you enjoyed them.
Have you ever subbed semisweet chocolate in this recipe? Thanks!
Hi Ashley! No, I recommend dark chocolate for the melting and flavor aspects.
Hello, can I use baking paper on a tray, and do these go chewy please?
Hi Emmerson! As per the instructions bake the cookie dough directly on a greased baking pan. Heat transfers instantly from the metal to the dough so that you get instant spread.
Made them this past weekend and they are our favorite of the 2 recipes I’ve tried from you 🙂
Thank you Katherine! Glad you enjoyed the recipe! 🙂
Hi!! These are delicious, tried them, but my cookies spread in a broken sort of way, they don't have smooth edges, it's like the edges cook too fast and crack, so even when I use a circle to give them a round shape they look a little cracked. Should I lower the temperature? Or any advice for them to spread evenly around the edges?
Hi Maria! Did you use a scale to measure the ingredients? Maybe also check you oven temp as it could be running hot.
If I don’t own a non stick baking tray, do you think a greased stainless steel tray will work? Or will that stick? I would guess a silicone mat would have the same issues as parchment paper.
Hi Mia! A greased steel tray should work.
THIS IS THE RECIPE I’VE BEEN LOOKING FOR‼️ I will NEVER buy another Chocolate Chip Cookie from anybody, anywhere. My House smells AMAZING. They are PERFECT! CHEFS KISS
Thank You for SHARING
Thanks for the feedback Ann! I'm so glad you enjoyed the recipe 🙂
This recipe is perfect -- they came out just exactly right.
Thank you Paula! Glad you enjoyed the recipe 🙂
Would you recommend any adjustments if using brown butter? If I use brown butter, should I let us come back to room temp and solidify or just cool and use still in liquid form?
Hi Briana! I haven't tested that but there would need to be some adjustments. You could try adding back some milk to make up for the loss of moisture from browning the butter. I would let it cool.
Hi! So I just made them, but mine didn’t really crinkle 😅 I used a weighing scale, so I’m sure the ingredients were correct. Used an oven thermometer as well, so the temp was correct too.
Hi Kristina! Did you grease the pan and bake only 6 per tray? Another possibility could be old baking soda.
Ohhh, yeah that could be it. Will buy new baking soda and try again! ❤️
This is my third time make them and they are delicious every single time. My absolute favourite recipe.
Thank you Afia! I'm so glad you love the recipe 🙂
These were so yummy! I usually go for a thicker cookie but had to try these. I loved them! Crispy on the outside with a chewy middle. Will be making these again!
Thank you Taylor! Glad you loved the cookie 🙂
I prefer smaller cookies like 20 grams in the scoop of raw dough Would that work with this recipe?
Hi Maureen! If you make them too small they won't spread as properly.
Finally! My dream chocolate chip cookie! Perfect! Thank you so much for this recipe! Throwing away my old “fav” chocolate chip cookie recipe!
You are welcome Rebecca! Thank you so much for the nice feedback 🙂
I have tried so many different cookie recipes over the years, trying to create the caramelized ripple edges and never succeeded, until now! The buttered pan and higher temperature made all the difference. I did reduce sugar by 20% and they still turned out perfect.
Thank you Joyce! Glad you enjoyed the cookies 🙂
This recipe turned out fantastic! Toffee edges just as described.
Thank you for sharing!
You are welcome Jeanne! I'm so glad you enjoyed the recipe 🙂
Hi! I`d love to try this recipe. Would there be any changes if I made them twice as big? 1.35 oz equals to 38 grams, I usually make my chocolate chip cookies at least of 70 grams.
Thanks in advance!
Hi Laura! I wouldn't recommend going any larger, as they will spread too much and be puddles.
Hi,
Could I just use parchment paper instead of greasing the baking pan?
Thanks in advance.
Nevermind just read why.
No problem. I hope you enjoyed the cookies 🙂
These were wonderful!! Next time I would like to add some chopped walnuts, if I did that would I reduce the amount of chocolate? Thank you!
Thank you Gina! You could probably add up to 1/2 cup of walnuts without making any adjustments.
This is such a great recipe, thank you for sharing! If we want to bake more than 6 at a time using two baking sheets, should we place them side by side on the same rack, or one on the rack below? Would the temperature and baking time stay the same? Thank you!
Hi Jasmine! It depends on how even the heat is in your oven. For best results I recommend baking 1 sheet at a time (and this is what I do as my oven is too uneven).