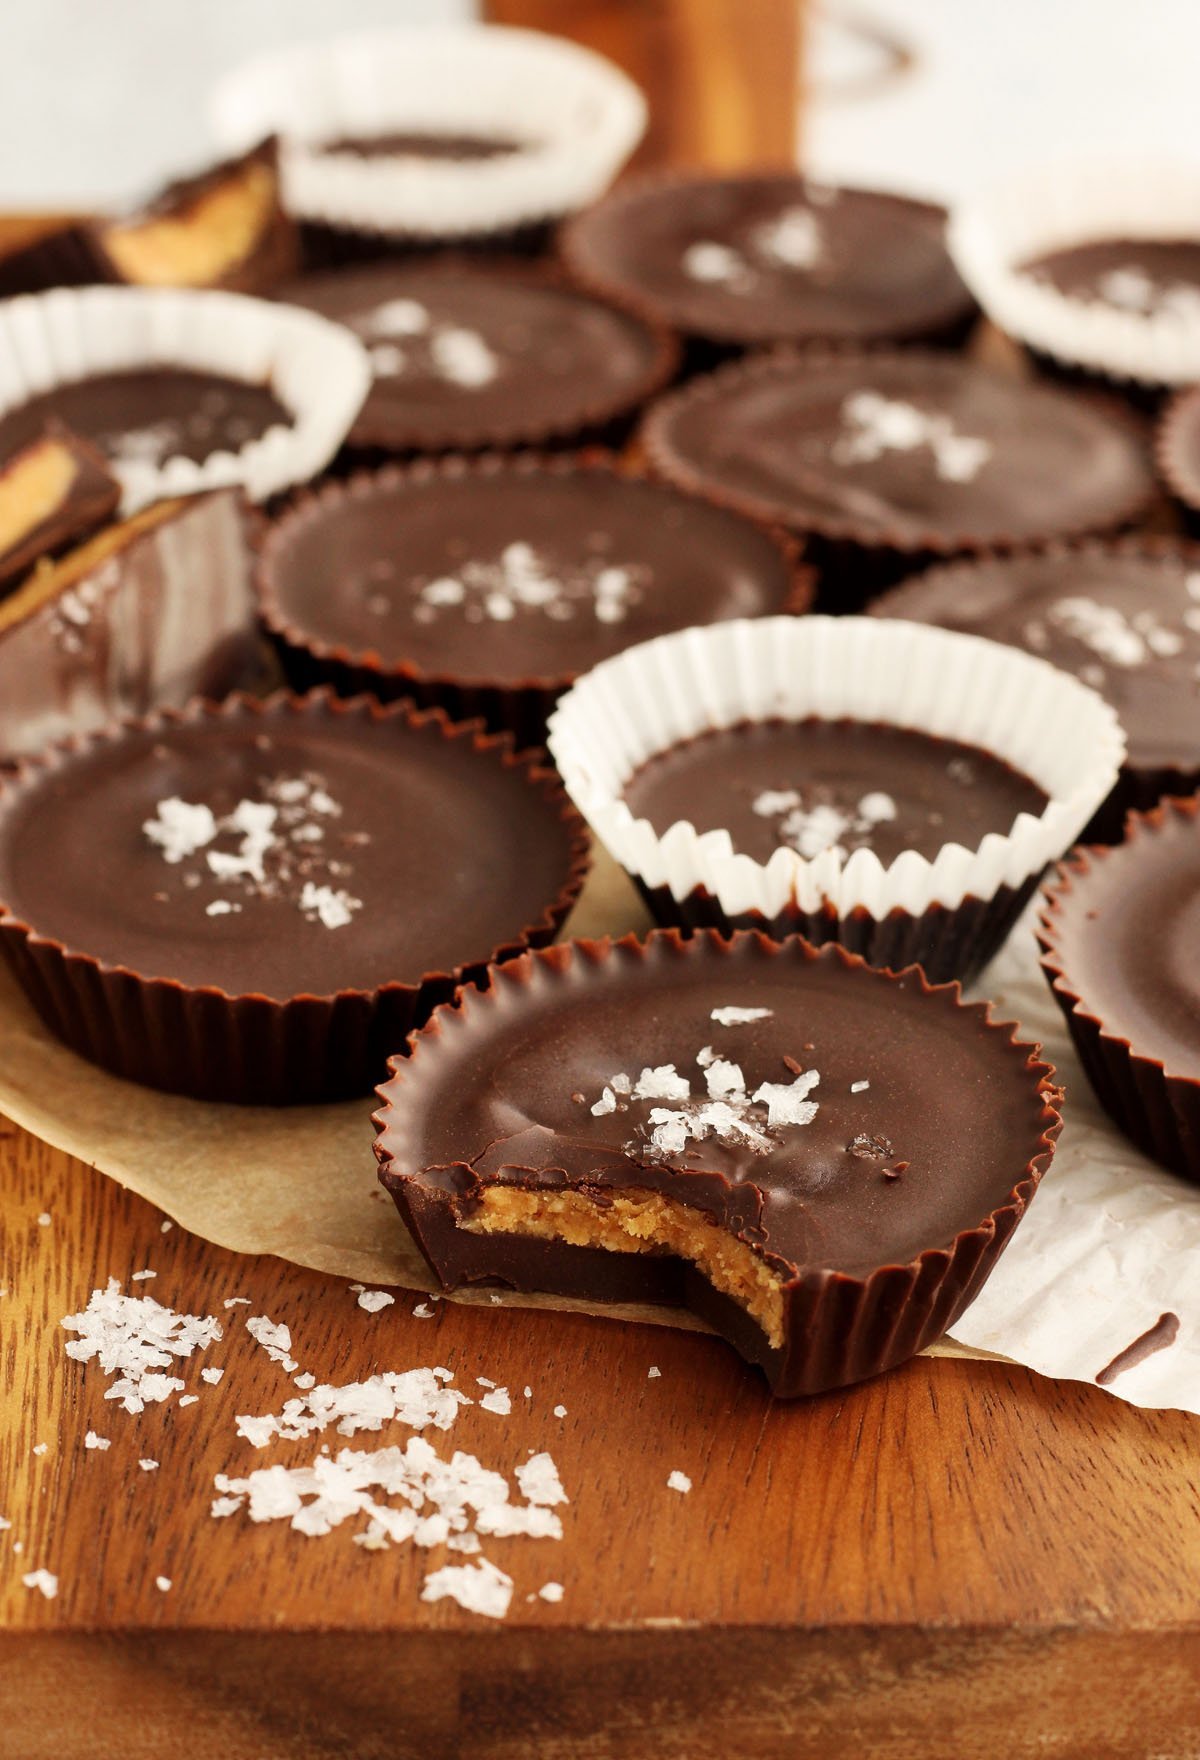
Healthy Homemade Dark Chocolate Peanut Butter Cups
Your favorite Halloween candy? Go: ______! If you say "Reese's" then you will love my recipe for Homemade Chocolate Peanut Butter Cups with a healthier sweet and salty peanut butter filling and smooth dark chocolate shell! Mine was the mini Aero bars. I was obsessed with Aero as a kid... and then Caramilk and then Reese's cups. Halloween candy is so great, and then when you taste it 20 years later you're like, "Whoa, that's sweet!" These homemade Chocolate Peanut Butter Cups are not only delicious, but they are good for you! They taste just like Reese's peanut butter cups, except way better. They're made with just 4 ingredients and you can use the darkest chocolate you can find. It's up to you.

WHY THIS RECIPE WORKS
- Fast & easy to make - this simple treat comes together in just one bowl with only 5 ingredients. It's a great treat to make with kids. Once the filling comes together, you simply portion it out and form little disks or patties. It's that easy!
- No-Bake dessert - there's no baking involved to make peanut butter cups. You simply mix some ingredients together and fill it into a chocolate-coated muffin paper.
- No special equipment required - if you have a standard muffin pan and paper liners, you can make these in a jiffy!
- Rich peanut butter flavor - if you love peanut butter, then you will certainly love these because they are so much more flavorful than store-bought Reese's peanut butter cups.
- Dark chocolate coating - I love the contrast of semi-sweet chocolate with the slightly sweet and salty peanut butter filling.
- Gluten free and vegan - these homemade peanut butter cups are naturally gluten free, dairy free and vegan as well so everyone can enjoy them.
- Better than Reese's - the texture of the filling is just perfect. It's very similar to a Reese's peanut butter cup, but without the hydrogenated oils and all that sugar. Plus, these have intense peanut butter flavor which makes them that much better!

INGREDIENTS FOR CHOCOLATE PEANUT BUTTER CUPS
- Peanut butter - I use smooth creamy unsalted natural peanut butter for this recipe (the drippy kind that you need to stir) to get a nice strong peanut butter taste.
- Maple syrup - peanut butter and maple is a lovely flavor combination and it adds the perfect amount of sweetness.
- Almond flour - fine ground blanched almonds helps to stiffen the filling so you can shape it. You may need more or less depending on the brand of peanut butter that you choose.
- Dark chocolate - semi-sweet dark chocolate is perfect since it is just the right amount of sweetness to enhance the filling which isn't too sweet. You can also use bittersweet chocolate if you really love dark chocolate.
- Coconut oil - this gives the melted chocolate coating more fluidity so that it is easier to coat the cups. It also prevents the need for tempering chocolate if you don't have time. However, if you are interested in learning how to temper chocolate, I have a full tutorial here.
- Salt - natural peanut butter is usually unsalted, and so we need to add some salt or else the flavor will be bland. It really makes a big difference.

WHAT TYPE OF CHOCOLATE TO USE FOR HOMEMADE CHOCOLATE PEANUT BUTTER CUPS?
Once you have all of your filling disks ready, it's time to melt the chocolate for the coating. I strongly recommend dark chocolate for these homemade chocolate peanut butter cups. Chocolate with greater than 60% cocoa solids is best because it will have a higher cocoa butter content which means it will flow more easily, and also taste great! I used 85% cocoa chocolate for this recipe and loved it. The chocolate is melted down with a bit of coconut oil which helps to make it more fluid chocolate for easy coating, and it also softens the texture of the coating so it has a soft bite at room temperature.

STEP BY STEP INSTRUCTIONS: HOW TO MAKE HOMEMADE CHOCOLATE PEANUT BUTTER CUPS
To make these cups, it is important to have paper cupcake liners. You can use the standard size or make mini ones.
- STEP 1). Stand the cupcake liners up on a baking tray or place them in a muffin pan to hold them upright.
- STEP 2). Make the filling. Stir together peanut butter, maple syrup, ¼ cup almond flour and salt until it forms a stiff paste. Add more almond flour if it is still too loose, then refrigerate for about 15 minutes until it is stiff enough to shape.
- STEP 3). Shape the filling. Roll heaped teaspoons of the mixture into smooth balls then flatten them in your hands and shape them into little disks or patties with a diameter just slightly smaller than the base of your paper liners.
- STEP 4). Melt chocolate. Melt together dark chocolate and coconut oil until smooth over a double boiler or in the microwave. Spoon about a teaspoon of the melted chocolate into each cup, spreading it out to cover the base and pushing it slightly up the sides to form an edge and completely cover the bottom.
- STEP 5). Place a peanut butter patty into the center of the chocolate base, but make sure that the disk is just slightly smaller than the diameter of the base so that it fits in nicely with chocolate all around it. Gently press the disk into the chocolate to help push some of the coating up the sides and around it, but don't let it touch the bottom. Spoon more chocolate over top to cover evenly.
- STEP 6). Chill. Sprinkle with flaky salt if desired and then refrigerate until set!


RECIPE FAQ
You can dip these in any type of chocolate - white, milk or dark. I recommend choosing couverture chocolate which has a high cocoa butter content designed to be more fluid for dipping and enrobing.
Once the chocolate is set firm, you can store them at room temperature in an airtight container. To keep them neat, place small pieces of parchment or wax paper between them. You can also keep them in the refrigerator for longer.
These delicious little treats will keep at room temperature for up to 2 weeks, and up to a month in the fridge. If you like them soft, keep them at room temperature, but if you like the texture of a crackly chocolate shell, then eat them straight from the fridge. I like them both ways!

If you love chocolate, check out these recipes!
Triple Chocolate Brownies Fudgy Grain Free Brownies Olive Oil Brownies with Date Fudge Frosting Fudgy Buckeye Brownies Outrageous Fudgy Chocolate Chip Cheesecake Brownies The BEST Small Batch Fudge Brownies Homemade Cosmic Brownies Recipe!More chocolate recipes please!
Looking for more things to bake with chocolate? Try these:
If you prefer healthier recipes, check out more of Christina's vegan recipes here:
Healthier Homemade Tahini Twix Bars (Vegan and Gluten-free)
Double Chocolate Zucchini Bread
Easy Almond Raspberry Lemon Bars (gluten free)
Healthier Homemade Dark Chocolate Peanut Butter Cups

Ingredients
Peanut Butter Filling:
- ½ cup (120ml) smooth natural unsalted peanut butter (no sugar added)
- 2 tablespoon (30ml) maple syrup
- ¼ - ⅓ cup (25g-35g) fine almond flour
- ⅛ teaspoon salt
Chocolate Coating:
- 7 oz (200g) dark chocolate (60-70% cocoa)
- 2 teaspoon (10ml) coconut oil
Instructions
- Line a standard muffin pan with paper liners, or place liners standing up on a baking tray.
- Make the filling. Stir together peanut butter, maple syrup, ¼ cup almond flour and salt until it forms a stiff paste. Add more almond flour if it is still too loose, then refrigerate for about 15 minutes until it is stiff enough to shape.
- Shape the filling. Roll heaped teaspoons of the mixture into smooth balls then flatten them in your hands and shape them into little disks or patties with a diameter just slightly smaller than the base of your paper liners.
- Melt together dark chocolate and coconut oil until smooth over a double boiler or in the microwave. Spoon about a teaspoon of the melted chocolate into each cup, spreading it out to cover the base and pushing it slightly up the sides to form an edge.
- Place a peanut butter patty into the center of the chocolate base, but make sure that the disk is just slightly smaller than the diameter of the base so that it fits in nicely with chocolate all around it. Gently press the disk into the chocolate to help push some of the coating up the sides and around it, but don't let it touch the bottom. Spoon more chocolate over top to cover evenly.
- Sprinkle with sea salt and refrigerate until set. Enjoy!

Question, can you use regular flour instead of almond flour for these?
Almond flourakes the treats glutinous free and adds flavour.
Ok, thank you!!
Hi Adelia! No, I wouldn't recommend that.
Do you have a calorie count ? Thank you!!
Hi Janine! Sorry I don't have that information, but there are free online resources/nutritional calculators that you can use by entering the recipe.
these are PERFECTION for a little chocoPB craving. healthy, delish and not too sweet. i used kirkland PB - and 70 percent dark chocolate. BINGO for better than Reese's. thanks for the beautiful recipe!
You are welcome Lisa! I'm so glad you enjoyed the recipe 🙂
We made these last night with both white chocolate and 60% dark chocolate. My very particular teens absolutely loved them! Husband too! Love this recipe.
Thank you Tracy! I'm so glad your family enjoyed the peanut butter cups 🙂
THANK YOU!!! New Christmas favourite for my family
You are welcome Kerry! I'm so glad you enjoyed the recipe 🙂
These are so good!!! I made mine with allulose maple flavored syrup and sugar free chocolate chips because I have to mindful of my bloodsugar. They turned out amazing!
Thank you Chrees! Glad you enjoyed the recipe.
I normally fail at every recipe but this is so easy and they actually taste perf. No mess. 10/10 do recommend.
Thanks so much Emi!
I tested this with 25g of peanut butter powder because that’s all I had on hand. It made them dry but my husband ate them anyway. If I try again I’ll use less powder and maybe more maple syrup to increase moisture—otherwise I might just have to get my hands on some almond flour and give that a try.
Do I have to use almond flour
Hi Kathy, you could use hazelnut meal.
Can I use oat flour
Hi Cydney, I've only tested it with almond flour, but you can give it a shot.
I made these for my friend who can't eat gluten and she loved them! She asked me to make them again.
I guess you’re baking again this week lol
these are so addictive!
They are!
wow these are so delicious and so easy to make! I will definitely make them again.
I made these on the weekend to share with my book club friends and they were loved by all! Thank you.
Thanks Tammy! Glad everyone enjoyed them.
I made these at Christmas to add to my cookie tray and they were a huge hit!
That's fantastic! So great that you tried something new!
These are so super easy to make and taste way better than reese’s. Healthier too!