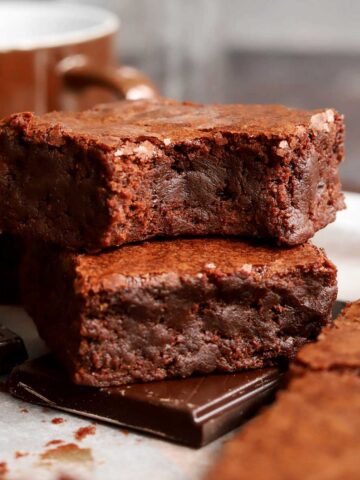
Thick Cocoa Brownies
This is the ultimate Cocoa Brownies recipe that makes decadent and indulgent brownies with a super moist, dense, fudgy and chewy texture. They have a striking bakery-style appearance as they bake up tall and thick with a shiny crinkle top. It's like a brownie version of my Best Moist Chocolate Cake with rich chocolate taste solely from cocoa powder, and a flavor that actually improves after a few days which means these brownies only get better! They aren't too sweet and even stay soft for almost a whole week. I use a blend of brown butter and melted butter to bring out the deep chocolate flavors in the cocoa and create a chewy texture.
I have so many brownie recipes on this site, and this one is for when you only have cocoa powder (no chocolate) and you really want that big bakery-style look. They have a similar texture to box mix brownies, but they are so much more delicious because homemade brownies are always better. If you love this recipe and you're looking for a more cocoa brownies, check out my ultra fudgy Better Than Box Mix Brownies, and for recipes with melted chocolate, try my popular Perfect Shiny Crust Brownies and Best Homemade Brownies.

WHY THIS RECIPE WORKS
- Easy recipe with simple ingredients - this homemade brownie recipe is so easy and you can make it with a few simple pantry ingredients. It doesn't require a lot of ingredients (less than a cup of butter) to make these beautiful, tall bakery-style brownies.
- Shiny top brownies - these brownies bake up with a gorgeous shiny crust on top just like a good box mix brownie. You can achieve that same look even when you make them from scratch by following my tips below.
- Pure cocoa brownies - this recipe calls for only cocoa powder instead of melted chocolate (similar to a box mix) so it is great for those times when you run out of chocolate. Unlike box brownies though, I only use butter because oil can give a greasy texture and I don't like the flavor it gives in brownies.
- Soft, chewy and fudgy texture - these brownies have it all! They are dense and fudgy, but also soft and melting with slightly chewy edges. The soft texture is because they don't have melted chocolate in the batter and it's the cocoa butter which has a high melting point that typically gives brownies a firmer texture. Cocoa butter is a harder fat than butter.
- Tall, thick and bakery-style - you will get a true bakery experience with these tall brownies. The recipe is carefully designed to accommodate 3 eggs for a thicker structure without having to use a ton of butter and sugar to balance it out. Eggs add moisture which is the culprit for cakey brownies, so I have made some adjustments to ensure we get a nice fudgy texture.
- Rich chocolate flavor - you can expect intense chocolate taste from cocoa powder that is elevated by the toasty, caramelized notes from brown butter. They are perfectly balanced and not too sweet.

WHAT MAKES THE SHINY TOP ON BROWNIES?
The shiny crust that forms on top of baked brownies is a result of dissolved sugar crystals that recrystallize as they dry at the surface during baking and reflect light. The crust can only form once the sugar is sufficiently dissolved, or if there is enough very finely milled sugar in the batter from melted chocolate which can dissolve very readily. This is why box mix brownies form that crust so easily: because they contain very fine sugar in addition to powdered sugar. Brownies made with melted chocolate form this shiny crackly top much easier than brownies made with cocoa powder only.
WHAT'S THE DIFFERENCE BETWEEN CHOCOLATE BROWNIES AND COCOA BROWNIES?
There are generally two ways to make brownies: with melted chocolate and with cocoa powder. Brownies made with just melted chocolate and butter like my Perfect Shiny Crust Brownies generally have a more dense and fudgy, stick-to-your-teeth texture since cocoa butter in chocolate is very hard at room temperature. So, brownies made with dark chocolate will have a firmer texture once cooled. Brownies made with cocoa powder use only melted butter as the source of fat and butter is a softer fat than cocoa butter so the final brownies will have a very soft texture that melts in your mouth with chewier edges.

INGREDIENTS FOR COCOA BROWNIES
- Cocoa powder - get your hands on some good cocoa powder! It's the main flavor in these brownies and you want it to shine so use the best you can find. I love to use this Dutch Process cocoa powder for most chocolate recipes, and natural cocoa (un-alkalized) is also recommended for its fruity taste. Sometimes I use half Dutch cocoa and half natural cocoa and I love the flavor complexity. Make sure you use unsweetened cocoa powder and not hot cocoa mix.
- Pure vanilla extract - vanilla plays a big role in enhancing the flavor of the chocolate, but especially so when baking with cocoa powder. I like this Madagascar Bourbon Vanilla extract.
- Salted butter - I highly recommend salted butter for this recipe - it's one of my secret ingredients! Salted butter has a richer dairy taste, almost like cultured butter, so it will enhance the taste of the cocoa. When making brownies with cocoa powder instead of chocolate, the flavor can sometimes fall flat and salted butter really makes a difference. You can use unsalted butter, and in that case you should double the amount of added salt. I brown some of the butter to drive off some moisture so the brownies are extra fudgy and chewy, while still accommodating the added moisture from 3 eggs for taller brownies. It also enhances the caramelized toasty notes of the cocoa.
- Granulated sugar - simple fine white granulated sugar keeps these brownies moist. It also dissolve more easily than brown sugar to give you that shiny top. I do not recommend reducing the sugar in this recipe or they will not have the same moist and fudgy texture and they may not have the shiny top.
- Powdered sugar - this is my secret for the best homemade box mix-style brownies. Icing sugar or powdered sugar will dissolve very quickly and easily in the moisture from the eggs to ensure you get that shiny top.
- Espresso powder - this is optional, and a little bit does enhance the flavor of chocolate desserts that use cocoa powder.
- Eggs - 3 whole eggs will provide majority of the structure in these brownies.
- Dark chocolate chips - this is optional, but you can add chocolate chips to cocoa brownies. These bittersweet chocolate callets are very convenient and really rich.
- All purpose flour - regular all purpose flour is perfect to make fudgy brownies. Use unbleached flour which will give you that nice dense texture.
- Salt - this is one of the most important ingredients in cocoa brownies. Without salt, they can just taste flat no matter how much cocoa you add. I always use fine table salt for baking as the finer crystals disperse and dissolve readily. If you use kosher salt, you will need to use twice as much since it is less dense, and it doesn't have the same impact on flavor enhancement compared to iodized salt for baking.

HOW TO SLICE BROWNIES CLEANLY
One of the most common questions that readers ask me is "how do you get such neat slices on your brownies?". Here are my 5 steps for cutting brownies so that you end up with clean edges. You can read this article here for the full detailed instructions, as well as watch a step-by-step video.
1) Line your baking pan with parchment paper.
2) Let the brownies cool completely.
3) Remove brownies from pan to a flat cutting surface, such as a large board or clean chopping block.
4) Use a sharp, straight, thin-bladed knife and run it under very hot water, then wipe it dry before slicing.
5) Carefully wipe the blade clean with paper towels or a kitchen cloth and repeat step 4 between each slice.

STEP BY STEP INSTRUCTIONS
- STEP 1.) Brown some of the butter. First brown ½ cup of the butter to add flavor and more importantly drive off some moisture so we get a nice fudgy and chewy texture. Follow the instructions in this post here to learn how to brown butter.
- STEP 1.) Melt butter with cocoa. Place remaining cold butter, cocoa powder and confectioner's sugar in a large mixing bowl and pour the hot browned butter over top. Stir immediately to bloom the cocoa and melt the remaining butter.
- STEP 2.) Mix eggs with sugar. Place eggs, brown sugar, vanilla and salt in a large bowl (or the bowl of a stand mixer) and mix for 30 seconds on medium speed using an electric handheld mixer. Gradually stream in granulated sugar and mix on medium-high speed for 3 minutes until creamy and lemon-colored.
- STEP 3.) Combine eggs and cocoa mixture. When the eggs are pale and thick, add the warm cocoa mixture and mix for 30 seconds until smooth and shiny.
- STEP 4.) Add dry ingredients. Add the flour and mix it in. It should be smooth and glossy, like thick hot fudge.
- STEP 5.) Bake. Pour the batter into your prepared pan bake for 25-30 minutes, until a toothpick inserted in the center comes out with moist crumbs attached. Make sure you do not over-bake these or they will be dry. Transfer pan to a wire rack and let brownies cool completely in the pan. Refrigerate for at least 1 hour before lifting out and cutting into squares.

EXPERT BAKING TIPS
- Use salted butter! Salted butter has a savory richness that really elevates and carries the cocoa flavor. Cocoa has no sugar or salt in it, so without a rich flavor carrier it can be rather unexciting. Use salted butter and see the difference yourself!
- Use a mixer. You can use a stand mixer or a hand mixer, but I do recommend using one since it will ensure that the sugar fully dissolved in the eggs for that shiny top.
- Invest in high quality cocoa powder. This is where it counts. I love to use this mild Dutch cocoa or this Natural cocoa for this recipe. Often I use equal parts of both for a very special flavor. I would not recommend black or onyx cocoa, such as Hershey's Black Cocoa.
- Use a kitchen scale. For best results, weigh your ingredients according to the measurements in the recipe card below using a kitchen scale.
- Measure flour accurately. Too much flour leads to dry brownies, especially when baking with brown butter since the moisture has been driven off, so be sure to use a scale or use the spoon and sweep method without packing the flour into the measuring cup.
- Sift the flour and cocoa powder to remove lumps which helps it incorporate evenly and minimizes how much you will need to mix it in.
- Use room temperature eggs. I can't stress this enough. Cold eggs will have a hard time dissolving the sugar, so make sure your eggs are at room temperature or even warm. I like to submerge them in a bowl of warm water for 10 minutes before baking.
- Mix the eggs with the sugar first instead of stirring the sugar into the melted chocolate. Sugar cannot dissolve in fat, but it can dissolve in the water within egg whites.
- Whisk the eggs and sugar thoroughly. This will help encourage the sugar too dissolve. The more you whisk, the more sugar dissolves and the thinner the crust will be on top (so thin it can flake off). I recommend mixing well, but don't try to whip if you want the crust to stick more.
- Avoid mixing on high speed. Do not whip the eggs and sugar on high speed because the goal is to dissolve the sugar and build some structure, but we do not want to introduce large air bubbles that will make the batter puff up excessively and sink on cooling. Controlled mixing on medium speed will create fine bubbles for a better texture.
- Do not use raising agents like baking soda or baking powder. Brownies are meant to be dense and using leavening will create gases that can make the brownie seem dry.
- Fold in the flour gently. Over-mixing after the flour is added can lead to a more doughy texture and flavor. Stop mixing as soon as you no longer see dry pockets of flour.
- Do not over-bake. Watch the baking time carefully as brownies made with cocoa powder are more prone to drying out. This brownie should take about 25 minutes when baked in a metal pan. A skewer should not come out clean. Instead it should come out with a few moist sticky bits attached. If it comes out clean then the brownies may be over baked, and if it comes out with wet batter then they are still a bit raw.
- Let brownies cool completely. Although it might be tempting to eat them warm from the oven, brownies reach their maximum flavor and fudginess when completely cooled. This is because the butter needs time to set and the flavor of cocoa powder will be more balanced.
- Slice only once thoroughly cooled or chilled. If you cut your brownies while still hot, the steam will escape and the sliced brownies will dry out faster than if you let them cool before slicing.

RECIPE FAQ
Yes, you can use unsalted butter. I really love making these brownies with salted butter because it adds another level of richness and offsets the sweetness and it creates a strong background flavor to carry the cocoa. I highly encourage you to try this recipe with salted butter, but if you choose to use unsalted butter, then add another ¼ teaspoon of salt.
You can use a light Dutch cocoa powder or natural cocoa powder for this recipe. Natural (unalkalized) cocoa has fruity, floral and acidic notes and is more complex than Dutch cocoa. Although Dutch cocoa (alkalized cocoa) has a darker color due to the alkalizing process, it does not always mean that it has more flavor.
Brownies can be chewy or fudgy, or a blend of both. Brownies get their chewiness from the right amount of sugar, and a higher ratio of sugar:butter and recipes that use mainly butter instead of melted chocolate tend to be chewier. Alternatively, recipes that use melted chocolate in the batter and have a high ratio of chocolate:butter tend to have a fudgy texture. More butter gives a softer chewier texture, while more chocolate and more sugar gives a fudgier texture thanks to the hard cocoa butter content. Cocoa butter is harder than butter at room temperature so it will give more "shortness" to the bite, creating the perception of fudginess. More butter will make brownies soft for a chewier texture.
Again, it's about dissolved sugar. Whisk the sugar into the eggs first. This will help it dissolve some, and also the bonds between sugar and egg proteins is what creates the thin tissue like crust. To help this along, always use room temperature (not cold) eggs. The warmer temperature helps sugar dissolve. The longer you whip the eggs with the sugar, the thinner and shinier the crust will be.
TIP: to bring eggs to room temperature quickly, submerge them in warm water for 10 minutes.
Yes you can add some nuts to this recipe! If you'd like to add some walnuts to complement the brown butter, I would recommend not more than ⅓ cup as they can dry out the batter.
If your brownies turn out dry, then it is most likely because they are over-baked. These low sugar brownies are ready when a skewer inserted into the center comes out with a few moist sticky crumbs attached - not wet batter, and NOT clean. If the skewer is clean then the brownies are over-baked and if the skewer has wet batter then they are still raw.
The number one reason why these would turn out dry is if they are over-baked. Check on the brownies at 25 minutes. Also, take care to measure the flour accurately because too much flour will certainly make these brownies dry.
These brownies keep really well at room temperature for up to 1 week as long as they are stored in an airtight container to prevent drying out. You can keep them in the fridge for a more dense texture.
To get neat clean squares when you slice the brownies, run a sharp knife under hot water and wipe it clean between each slice. See my steps in this article for more details.
If you love brownies, check out all my other brownie recipes on this site below!
Buckeye Peanut Butter Fudge Brownies Outrageous Fudgy Chocolate Chip Cheesecake Brownies Peanut Butter Cheesecake Swirl Brownies Homemade Chewy Cosmic Brownies The BEST Small Batch Chocolate Fudge Brownies Perfect Shiny Crust Fudge Brownies Triple Chocolate Truffle BrowniesVideo
Thick Cocoa Brownies

Ingredients
- 3 large eggs, warmed slightly under hot running water
- ½ cup (110g) packed light brown sugar
- 1 ½ teaspoon (7ml) pure vanilla extract
- ¼ teaspoon fine table salt (or ¾ teaspoon if using unsalted butter)
- ⅔ cup (135g) granulated sugar
- ½ teaspoon espresso powder (optional)
- ¾ cup plus 1 tbsp (70g) cocoa powder (I prefer this Dutch cocoa or this one)*
- ¾ cup (90g) powdered confectioner's sugar
- ¾ cup plus 1 tbsp (183g) salted butter (cold is fine), divided
- ⅔ cup (95g) all-purpose flour
*I love to make this recipe with equal parts Dutch Cocoa and Natural Cocoa for a beautiful balance of deep roasted cocoa notes and complex fruity flavor.
Instructions
- Preheat the oven to 350°F. Line an 8x8-inch square metal baking pan with parchment paper leaving a 2-inch overhang at all sides.
- Place eggs, brown sugar, vanilla and salt in a large bowl (or the bowl of a stand mixer) and mix for 30 seconds on medium speed using an electric handheld mixer. Gradually stream in granulated sugar and continue to mix on medium speed for 3 minutes until creamy and pale yellow. Do not mix on high speed because the goal is to dissolve the sugar and build some structure, but we do not want to introduce large air bubbles. Mix in espresso powder if you're using it and set aside while you prepare the cocoa mixture.
- Place remaining 5 tablespoon (70g) of butter, cocoa powder and powdered sugar in a medium heatproof bowl and set aside.
- Brown some of the butter. Place remaining ½ cup (113g) of the butter in a saucepan and follow the instructions in this post here to learn how to brown butter. It's easy! Melt the butter gently over medium heat in a saucepan and and continue to cook until a dense foam forms at the surface and the milk solids appear a golden brown specks.
- Pour hot brown butter into the bowl over the butter, powdered sugar and cocoa and whisk until the mixture is smooth. The heat will melt the rest of the butter and also melt some powdered sugar to encourage the formation of a shiny top on the baked brownies. If it is really cold in your house and the mixture isn't smooth, place the bowl in the microwave for 20-30 seconds until completely melted and glossy.
- Add the still-warm cocoa mixture to the whipped egg mixture and mix it in using a spatula until smooth and glossy. The batter should tighten up and that's how you know the fat is emulsified. Sift the flour over the batter and fold it in gently until evenly combined. Stop mixing as soon as you don't see any dry pockets of flour and be careful to not over-mix. It should be smooth and glossy, like thick hot fudge.
- Pour the batter into your prepared pan and use a small offset spatula to smooth out the surface. Tap the pan on the counter to bring any large air bubbles to the surface, then run the spatula over the top to pop them. Bake for 25-28 minutes* or until a toothpick inserted in the center comes out with moist sticky crumbs attached. Make sure you do not over-bake these or they will be dry. Transfer pan to a wire rack and let brownies cool completely in the pan. Refrigerate for at least 1 hour before lifting out and cutting into squares.
Girrrrrrrllll!!!! This is the best brownie I have ever made at home. Oh my gosh. Sweet, fudgy, crisp on top. Literally everything anyone could want in a brownie, and what's shocking me is that I didn't need to use melted chocolate! I love it I'm so impressed.
Thank you Nicole! I'm so glad you loved the brownies 🙂
best brownie recipe i’ve ever used. The top was so shiny i thought it was raw and was so close to baking it more it was fully cooked and and a nice crackly sheen top and moist chewy centre! i added peppermint extract cuz i love mint chocolate
Thank you Sal! Glad you enjoyed the brownies! Nice combination with the mint 🙂
I made this recipe last weekend and it was indeed an amazing brownie! I measure all the ingredients, I only have Cacao Barry cocoa powder so next time I might have to get my hands on Callebaut for a richer chocolate flavor! I love trying different brownie recipes and I must say this recipe is definitely a keeper! I will say the texture is between chewy and fudgy but more chewier but gets fudgier after 2-3 days, I have some left in the fridge and it's still moist, and yes chewy and fudgy 😂 Your chocolate cake recipe is also the only recipe I use when I bake chocolate cake! Love it!
Thank you so much Ess! I'm so glad you enjoyed the recipe 🙂
Wonderful brownies!!!
I’ve made several of Christina’s recipes and this one is definitely my favorite 🙂
They’re easy to make and there’s no need to melt chocolate. The result is spectacular: rich chocolate flavor, soft and moist on the inside, and crispy on the outside. Absolutely delicious!
Thank you for such amazing recipes, Christina <3
You are welcome Maria! Thanks for the feedback! 😀
Can I double the recipe and use a 13x9 pan
Hi Angela! Yes you can. You may need to increase baking time by a few min.
Can this recipe be made with oil?
Hi Mavrah! I wouldn't recommend it as oil can give a greasy texture and the flavor will be poor.
These are the BEST brownies I have ever made!! I literally made 2 batches in one week because of how fast everyone ate them. Thank you for this!!
I look forward to trying new recipes from this site!
You are welcome Olivia! I'm so glad everyone enjoyed the brownies 🙂
Def the best brownies I have ever made-even better than boxed!
Hi Sophia, thanks so much! I'm so glad you enjoy them!
Wow! These really are perfection. Prob the best homemade brownie recipe I've ever made. The browned butter flavor takes it over the top! This recipe is a keeper 🙂 THANKS!
You're welcome Diane! So happy you enjoyed them!
Super thick just as she calls them! They are so chocolaty, not too sweet and perfectly fudgy.
Thank you Andrea!
Hi, there. Would you happen to know the preferred temp to pull them, just to take the guess work out of the equation? Since its cocoa only, Im not sure if my normal 195° is sufficient. Thank you!!
Hi Beth. I have never measured the internal temp of this brownie at end of baking, but I would agree that 195F would be sufficient.
Can I use black alkalized cocoa powder?
Hi Tina, I wouldn't recommend it.
Dear Christina,
Firstly - This looks absolutely mouth watering delicious!
I am not used to baking at all, and for that reason am I reading and re-reading the Step by Step, and suddenly I'm getting a wee bit confused, when it says "whisk in icing sugar" is that what "powdered sugar" from the list of ingredients ?
Hi Trine, yes powdered sugar is the same as icing sugar. Sorry for the confusion. I will make that more clear.
Hello! these look amazing and i wanted to check if we can adjust the sugar? leaning more towards less sugar, would you recommed?
hi! what's the difference between this recipe and better than box mix recipe? thanks
Hi Denisse, great question! They are similar. This recipe produces taller, thicker brownies and they have a slightly chewier texture.
We love these brownies! I made them as a gift. However, we eat low sugar food in our home. Could this recipe work with a sugar substitute, erythritol perhaps?
Thank you Annette! Sorry, this recipe has only been tested with sugar.
Hi Christina!
Brownies look divine! Just made a batch, however, my batter was quite thick, not as smooth as yours. Measured the ingredients just as you listed, do you know why this could have happened?
Hi Babs! Did you use a scale to measure the ingredients? Could be too much flour. Are you using large eggs?
Yes used a scale and large eggs but Ok finally finished making them and yeah the batter was a bit thick but omg! Let them set in the fridge overnight and they came out perfectly!! The most fudgy brownies I’ve ever made, I think I’ve found my new go to recipe 🙂
That's great to hear Babs! I'm so glad you enjoyed them! 🙂
PERFECTION! This is exactly the texture I was looking for in a brownie. So glad I found this recipe and I will continue making them.
Thanks Madeline! I'm so happy you enjoy this brownie recipe.
How thick are these brownies in the 8x8
Hi Leann, I'd say they are about 1 1/2 inches in height.
This is our new favorite brownie recipe. So chewy and fudgy and perfectly sweet. Thanks for another home run recipe!
Made the recipe for the second time I really scored some brownie points with my Ole Lady
Lol. Thanks Rob!
Thank you so much Meg! So glad you like the recipe!
I’ve made brownies many times before, and, in fact, always felt that I had a superior recipe! Since following @scienticificallysweet, I’ve found a new understanding of chemical processes with baking, and I decided to give these brownies a try. I was very pleased not just with how exceptional they turned out to both look and taste, but with the instructions, as they included details explaining why these steps were important to the end result. I’ve only just begun to try some of her recipes, but each one I’ve made thus far has been incredible, and I look forward to trying others!
Hi Denise! Thank you so much for all the positive feedback! I am so glad you have been enjoying the recipes.
Good morning,
Do you have an approximate weight for the butter after browning? I'd like to try this using a dairy free browned butter.
Thank you
Hi Jill. Based on the water content in the average butter, I would say 92-95g.
Would you clarify what you mean in step #5? It's a bit confusing the way it's written.
Thanks for pointing that out MS. I have edited step #5 to be more clear.
Whoa these are goooooood! My family devoured them and they're already asking me to make them again. 12/10.
Thank you Shane! I'm so glad your family enjoyed the brownies.